Working with the Basic Installation Wizard

The Extreme Networks ExtremeWireless system provides a basic installation wizard that can help administrators configure the minimum controller settings that are necessary to deploy a functioning ExtremeWireless system solution on a network.

Use the Basic Installation Wizard to quickly configure the controller for deployment, and later to revise the controller configuration as needed.

The Basic Installation Wizard launches when you log on to the controller for the first time and when the system has been reset to the factory default settings. You can also launch the wizard from the left pane of the controller Configuration screen anytime.

To configure the controller using the Basic Installation Wizard:

  1. Log on to the controller. For more information, see Logging on to the ExtremeWireless Appliance.
  2. From the top menu, click Controller. The Wireless Controller Configuration screen displays.
  3. In the left pane, click Administration > Installation Wizard.
    The Basic Installation Wizard screen displays.
    Click to expand in new window
    Graphics/installation_wizard.png
  4. In the Time Settings section, configure the controller timezone:
    • Continent or Ocean — Select the continent for the time zone.
    • Time Zone Region — Select the appropriate time zone region for the selected continent.
  5. To configure the controller‘s time, do one of the following:
    • To manually set the controller time, click Set time. The Year, Month, Day, HR, and Min. fields display, where you can use the drop-down lists to specify the time values.
    • To use the controller as the NTP time server, select the Run local NTP Server option. In the Server field, enter the IP address or Domain Name for the NTP server.
    • To use NTP to set the controller time, select the Use NTP option, and then type the IP address of an NTP time server that is accessible on the enterprise network.

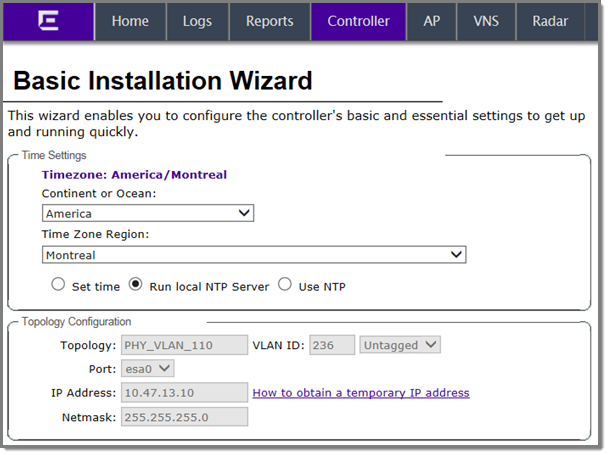
      The Network Time Protocol is a protocol for synchronizing the clocks of computer systems over packet-switched data networks.

  6. In the Server field, enter the IP address or Domain Name for the NTP server.
    Note

    Note

    The Server Address field supports both IPv4 and IPv6 addresses.
  7. In the Topology Configuration section, the physical interface of the controller data port, the IP Address and Netmask values for the data port, and the VLAN ID display as read-only values.
    For information on how to obtain a temporary IP address from the network, click How to obtain a temporary IP address.
  8. Click Next. The Management screen displays