Static configuration settings allow you to set up branch office support. These settings can be employed whenever required, and are not dependent on branch topology. In the branch office model, while the controller is at a central office, APs are installed in remote sites. The APs must be able to interact in both the local site network and the central office network. When this is the case, a static configuration is recommended.
For initial configuration of a wireless AP to use a static IP address assignment:

Note
If a wireless AP with a statically configured IP address (without a statically configured Wireless Controller Search List) cannot register with the controller within the specified number of retries, the wireless AP uses SLP, DNS, and SLP multicast as a backup mechanism.To set up a wireless AP using static configuration:

Caution
Caution should be exercised when using this feature. For more information, see Configuring VLAN Tags for Wireless APs.If the Wireless AP VLAN is not configured properly (wrong tag), connecting to the AP may not be possible. To recover from this situation, you need to reset the AP to its factory default settings. For more information, see the Extreme Networks ExtremeWireless Maintenance Guide .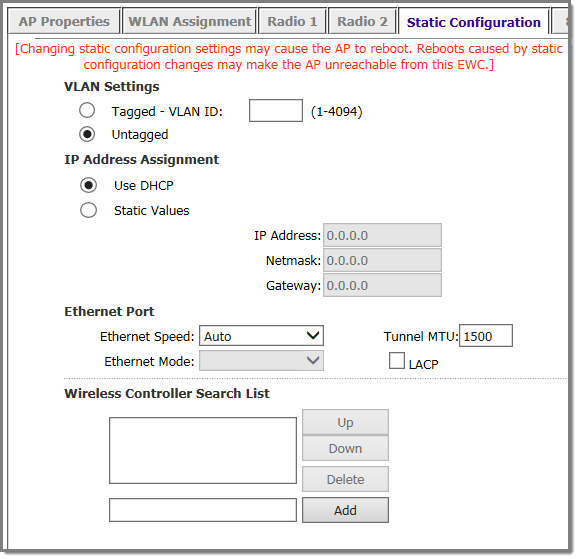
Note
Client Port configuration is available for the AP3912. For more information, see Assigning WLAN Services to Wired Client Ports.Static Configuration Properties
| Field/Button | Description |
|---|---|
| VLAN Settings | |
| Tagged | Select if you want to assign this AP to a specific VLAN and type the value in the box. |
| Untagged | Select if you want this AP to be untagged. This option is selected by default. |
| VLAN ID | Enter a VLAN ID. Valid values are 2 to 4094 |
| IP Address Assignment | |
| Use DHCP | Select to enable Dynamic Host Configuration Protocol (DHCP). This option is enabled by default. |
| Static Values | Select to specify the IP address of the AP. |
| IP Address | Type the IP address of the AP. |
| Netmask | Type the appropriate subnet mask to separate the network portion from the host portion of the address. |
| Gateway | Type the default gateway of the network. |
| Ethernet Port | |
| Ethernet Speed | If the AP has an Ethernet port, select values in the Ethernet Speed and Ethernet Mode drop down lists. |
| Ethernet Mode | If the AP has an Ethernet port, select values in the Ethernet Speed and Ethernet Mode drop down lists. |
| Tunnel MTU | Enter a static MTU value, from 600 to 1500, in the Tunnel MTU box. The maximum MTU can be increased to 1800 bytes by enabling Jumbo Frames support (for more information, see Setting Up the Data Ports). If the wireless software cannot discover the MTU size, it enforces the static MTU size. Set the MTU size to allow the source to reduce the packet size and avoid the need to fragment data packets in the tunnel. |
| LACP | Applies to the AP38xx and AP39xx only. Click to Enable Link Aggregation Control Protocol. This feature allows higher throughput by combining the two Ethernet ports. This feature is disabled by default. |
| Wireless Controller Search List | |
| Up | Select a controller and click the Up button to modify the order of the controllers. When an AP searches for a controller to register with, it begins with the first controller in the list. |
| Down | Select a controller and click the Up button to modify the order of the controllers. When an AP searches for a controller to register with, it begins with the first controller in the list. |
| Delete | Click to remove the controller from the list so that it can no longer control the AP. |
| Add | In the Add box, type the IP address of
the controller that will control this AP then click the Add
button to add the IP address is added to the list. Repeat this
process to add the IP addresses of up to three controllers. This feature allows the AP to bypass the discovery process. If the Wireless Controller Search List box is not populated, the AP uses SLP unicast/multicast, DNS, or DHCP vendor option 43 to discover a controller. For the initial AP deployment, it is necessary to use one of the described options in Discovery and Registration. |
| Additional Buttons | |
| Copy to Defaults | To make this AP‘s configuration be the system‘s default AP settings, click Copy to Defaults. A pop-up dialog asking you to confirm the configuration change is displayed.To confirm resetting the system‘s default AP settings, click OK. |
| Reset to Defaults | If you have an AP that is already configured with its own settings, but would like the AP to be reset to use the system‘s default AP settings, use the Reset to Defaults feature |
| Apply | Click to save your changes. |
 Print
this page
Print
this page Email this topic
 Feedback
 View PDF
 Download EPUB