You can enable the following QoS modes for a WLAN (Wireless Local Area Network) Service:
The APs are capable of supporting 5 queues. The queues are implemented per radio. For example, 5 queues per radio. The queues are:
Queues
| Queue Name | Purpose |
|---|---|
| AC_VO | Voice |
| AC_VI | Video |
| AC_BK | Background |
| AC_BE | Best Effort |
| AC_TVO | Turbo Voice |
The controller supports the definition of 8 levels of user priority (UP). These priority levels are mapped at the AP to the best appropriate access class. Of the 8 levels of user priority, 6 are considered low priority levels and 2 are considered high priority levels.
WMM clients have the same 4 AC queues. WMM clients will classify the traffic and use these queues when they are associated with a WMM-enabled AP. WMM clients will behave like non-WMM clients—map all traffic to the Best Effort (BE) queue—when not associated with WMM-enabled AP.
The prioritization of the traffic on the downstream (for example, from wired to wireless) and on the upstream (for example, from wireless to wired) is dictated by the configuration of the WLAN Service and the QoS tagging within the packets, as set by the wireless devices and the host devices on the wired network.
Both Layer 3 tagging (DSCP) and Layer 2 (802.1d) tagging are supported, and the mapping conforms with the WMM specification. If both L2 and L3 priority tags are available, then both are taken into account and the chosen AC is the highest resulting from L2. If only one of the priority tags is present, it is used to select the queue. If none is present, the default queue AC_BE is chosen.

Note
If the wireless packets to be transmitted must include the L2 priority (send to a WMM client from a WMM-enabled AP), the outbound L2 priority is copied from the inbound L2 priority if available, or it is inferred from the L3 priority using the above table if the L2 inbound priority is missing.Traffic Prioritization
| VNS type | Packet Source | Packet type | L2 | L3 |
|---|---|---|---|---|
| Tunneled | Wired | Untagged | No | Yes |
| Branch | Wired | VLAN (Virtual LAN) tagged | Yes | Yes |
| Branch | Wired | Untagged | No | Yes |
| Branch or Tunneled | Wireless | WMM | Yes | Yes |
| Branch or Tunneled | Wireless | non-WMM | No | Yes |
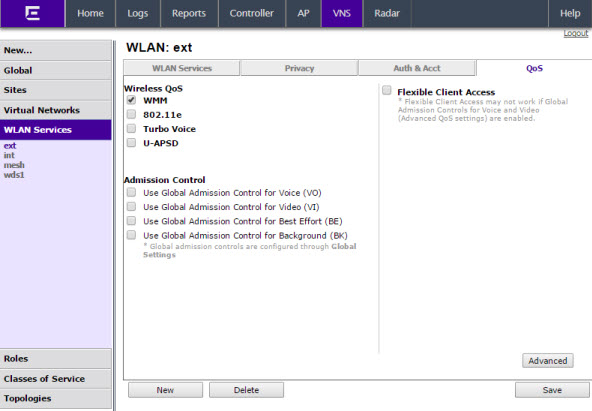
WLAN Services QoS Tab - Fields and Buttons
| Field/Button | Description |
|---|---|
| Wireless QoS | From the Wireless QoS
list, do the following: WMM — Select to enable the AP to accept WMM client associations, and classify and prioritize the outbound traffic for all WMM clients. Note that WMM clients will also classify and prioritize the inbound traffic. WMM is part of the 802.11e standard for QoS. If selected, the Turbo Voice and Enable U-APSD options are displayed. 802.11e — Select to enable the AP to accept WMM client associations, and classify and prioritize the outbound traffic for all 802.11e clients. The 802.11e clients will also classify and prioritize the inbound traffic. If selected, the Turbo Voice and the Enable U-APSD options are displayed: Turbo Voice — Select to enable all out traffic that is classified to the Voice (VO) AC and belongs to that VNS to be transmitted by the AP via a queue called Turbo Voice (TVO) instead of the normal Voice (VO) queue. When Turbo Voice is enabled together with WMM or 802.11e, the WMM and/or 802.11e clients in that VNS are instructed by the AP to transmit all traffic classified to VO AC with special contention parameters tailored to maximize voice performance and capacity. Enable U-APSD — Select to enable the Unscheduled Automatic Power Save Delivery (U-APSD) feature. This feature can be used by mobile devices to efficiently sustain one or more real-time streams while being in power-save mode. This feature works in conjunction with WMM and/or 802.11e, and it is automatically disabled if both WMM and 802.11e are disabled. |
| Admission Control | From the Admission Control
list, do the following: Use Global Admission Control for Voice (VO) - Select to enable admission control for Voice. With admission control, clients are forced to request admission to use the high priority access categories in both inbound and outbound directions. Admission control protects admitted traffic against new bandwidth demands. For more information, see VNS Global Settings. Use Global Admission Control for Video (VI) - This feature is only available if admission control is enabled for Voice. With admission control, clients are forced to request admission to use the high priority access categories in both inbound and outbound directions. Admission control protects admitted traffic against new bandwidth demands.Select to provide distinct thresholds for VI (video). For more information, see VNS Global Settings. Use Global Admission Control for Best Effort (BE) - If the client does not support admission control for the access category that requires admission control, the traffic category will be downgraded to lower access category that does not have Mandatory Admission control. For example, if admission control is required for video, and client does not support admission control for video, traffic will be downgraded to Best Effort (BE). For more information, see VNS Global Settings. Use Global Admission Control for Background (BK)- This feature is only available if admission control is enabled for Background. With admission control, clients are forced to request admission to use the high priority access categories in both inbound and outbound directions. Admission control protects admitted traffic against new bandwidth demands. For more information, see VNS Global Settings. |
| Flexible Client Access | Select the checkbox to enable flexible client
access. Flexible client access levels are set as part of the VNS
global settings. Note: TSPEC must be disabled when using Flexible Client
Access.
|
| Advanced button | |
| Priority Processing | |
| Priority Override | Select this checkbox to force DSCP and a
service class. Note: When Priority
Override is enabled, the configured service
class forces queue selection in the outbound direction, the
802.1P user priority for the VLAN tagged Ethernet packets and
the user priority for the wireless QoS packets (WMM or 802.11e),
according to the mapping between service class and user
priority. If Priority Override is enabled and the VNS is not
locally bridged, the configured DSCP value is used to tag the IP
header of the encapsulated packets. The AP does not override the
DSCP in the IP header of the user packet.
|
| DSCP | From the drop-down list, click the DSCP value used to tag the IP header of the encapsulated packets. For more information, seeDefining the DSCP and Service Classifications. |
| Service Class | Select one of the following service
classes:
Note: If you want to assign a
service class to each DSCP marking, clear the Priority
Override checkbox and define the DSCP service
class priorities in the DSCP classification
table.
|
| Advanced Wireless QoS options (Options are only displayed if the WMM or 802.11e checkboxes are selected) |
|
| UL Policer Action | If Use Global Admission Control
for Voice (VO) or Use Global Admission Control for Video
(VI) is enabled, click the action you want the AP to
take when TSPEC violations occurring on the inbound direction are
discovered: Do nothing — Click to allow TSPEC violations to continue when they are discovered. Data transmissions will continue and no action is taken against the violating transmissions. Send DELTS to Client — Click to end TSPEC violations when it they are discovered. This action deletes the TSPEC. |
| DL Policier Action | If Use Global Admission Control
for Voice (VO) or Use Global Admission Control
for Video (VI) is enabled, click the action you want
the AP to take when TSPEC violations occurring on the outbound
direction are discovered: Do nothing — Click to allow TSPEC violations to continue when they are discovered. Data transmissions will continue and no action is taken against the violating transmissions. Downgrade — Click to force the transmission‘s data packets to be downgraded to the next priority when a TSPEC violation is discovered. Drop — Click to force the transmission‘s data packets to be dropped when a TSPEC violation is discovered. |
 Print
this page
Print
this page Email this topic
 Feedback
 View PDF
 Download EPUB