Before installing a Summit 1100 W DC power supply:
- Verify that the switch rack or chassis has been
grounded.
- Verify that the airflow direction for the power supply is
the same as the airflow direction of the installed fan modules in the
switch.
To install the power supply,
follow these steps:
- Attach an
ESD-preventive wrist strap to your bare wrist and connect the metal end to an
appropriate ground point on the rack.
-
If necessary, remove a blank panel from the rear of the
switch.
-
Verify that the power supply is
right side up.
-
Verify that the direction of ventilation airflow
is the same for both the power supply and the switch.
In a switch with front-to-back airflow, the fan modules
are labeled Air Out.
In a switch with back-to-front airflow, the fan modules
are labeled Air In.
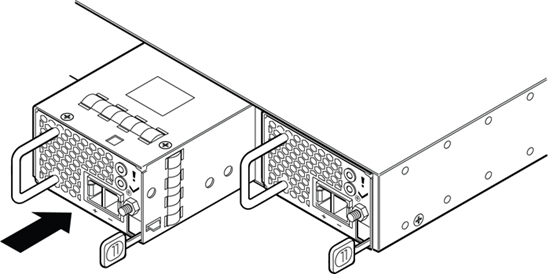
-
Carefully slide the power
supply all the way into the power supply bay.
- Push the power supply in
until the latch snaps into place.

Caution
Do not slam the power supply into the
switch.
-
To install a second power supply, repeat the
procedure.

Note
If power supplies are not installed in
both power supply bays, be sure to install a cover over the unoccupied bay.
Unoccupied bays must always be covered to maintain proper system ventilation
and EMI levels.
-
Connect the ground wire, following the steps in
Connecting the Ground Wire to a 450 W or 550 W DC Power Supply.