This section describes the process of creating managed WLAN on an RFS 4000 wireless controller, and associating it with the AP 7161 and AP 7602access points.
Upon completion, you will have created a WLAN on a RFS 4000 model wireless controller using a DHCP server to allocate IP addresses to associated wireless clients.
Verify the following conditions have been satisfied before attempting the WLAN configuration activities described in this section:
This section defines the network design being implemented.
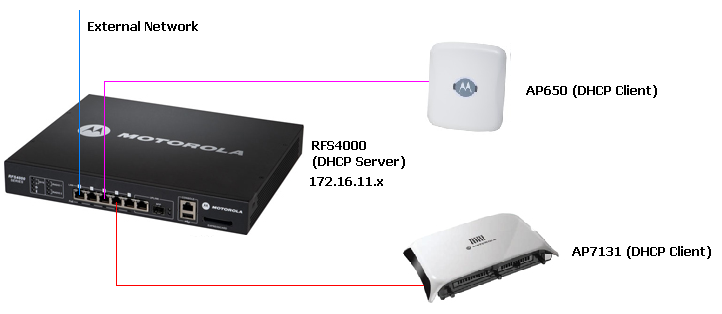
This is a simple deployment scenario, with the Access Points connected directly to the wireless controller. One wireless controller port is connected to an external network.
On the RFS 4000 wireless controller, the GE1 interface is connected to an external network. Interfaces GE3 and GE4 are used by the Access Points.
On the external network, the wireless controller is assigned an IP address of 192.168.10.188. The wireless controller acts as a DHCP server for the wireless clients connecting to it, and assigns IP addresses in the range of 172.16.11.11 to 172.16.11.200. The rest of IPs in the range are reserved for devices requiring static IP addresses.
These instructions are for configuring your first WLAN using the wireless controller CLI.
Use a serial console cable when connecting to the wireless controller for the first time. Set the following configuration when using the serial connection:
When powering on the wireless controller for the first time, you are prompted to replace the existing administrative password. The credentials for logging into the wireless controller for the first time are:
User Name: admin
Password: admin123
Ensure the new password created is strong enough to provide adequate security for the wireless controller managed network.
After logging in to the controller, follow the steps below to configure a controller-managed WLAN:
 Print
this page
Print
this page Email this topic
 Feedback
 View PDF
 Download EPUB