PPP over Ethernet (PPPoE) is a data-link protocol for dialup connections. PPPoE allows the access point to use a broadband modem (DSL, cable modem, etc.) for access to high-speed data and broadband networks. Most DSL providers support (or deploy) the PPPoE protocol. PPPoE uses standard encryption, authentication, and compression methods as specified by the PPPoE protocol.
PPPoE enables controllers, service platforms, and access points to establish a point-to-point connection to an ISP over existing Ethernet interface.
To provide this point-to-point connection, each PPPoE session learns the Ethernet address of a remote PPPoE client, and establishes a session. PPPoE uses both a discover and session phase to identify a client and establish a point-to-point connection. By using such a connection, a Wireless WAN failover is available to maintain seamless network access if the access point's Wired WAN should fail.

Note
PPPoE-enabled devices continue to support VPN, NAT, PBR, and 3G failover on the PPPoE interface. Multiple PPPoE sessions are supported using a single user account user account if RADIUS is configured to allow simultaneous access.When PPPoE client operation is enabled, it discovers an available server and establishes a PPPoE link for traffic slow. When a wired WAN connection failure is detected, traffic flows through the WWAN interface in fail-over mode (if the WWAN network is configured and available). When the PPPoE link becomes accessible again, traffic is redirected back through the access point's wired WAN link.
When the access point initiates a PPPoE session, it first performs a discovery to identify the Ethernet MAC address of the PPPoE client and establish a PPPoE session ID. In discovery, the PPPoE client discovers a server to host the PPPoE connection.
Note
The WiNG 7.1 releases does not provide PPPoE support on the AP505 and AP510 model access points. This feature will be supported in future releases.To create a PPPoE point-to-point configuration:
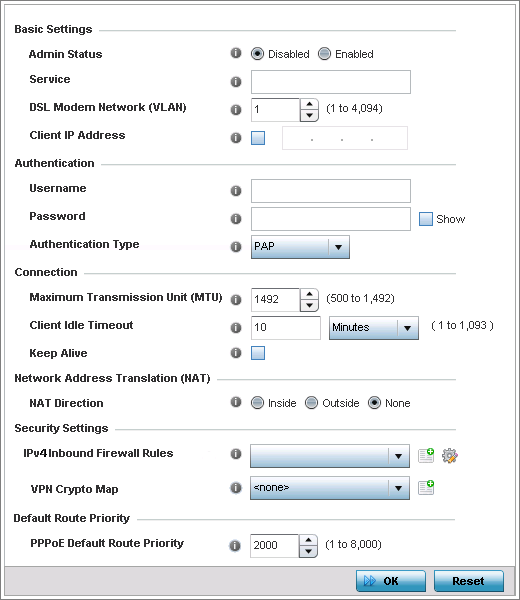
| Enable PPPoE | Select this option to support a high speed client mode point-to-point connection using the PPPoE protocol. The default setting is disabled. |
| Service | Enter the 128-character maximum PPPoE client service name provided by the service provider. |
| DSL Modem Network (VLAN) | Set the PPPoE VLAN (client local network) connected to the DSL modem. This is the local network connected to the DSL modem. The available range is 1 - 4,094. The default value is 1. |
| Client IP Address | Provide the numerical (non hostname) IP address of the PPPoE client. |
| Username | Provide the 64 character maximum username used for authentication support by the PPPoE client. |
| Password | Provide the 64 character maximum password used for authentication by the PPPoE client. Click Show to display the characters that make up the password. |
| Authentication Type | Specify the authentication type used by the PPPoE client, and whose credentials must be shared by its peer access point. Supported authentication options include None, PAP, CHAP, MSCHAP, and MSCHAP-v2. |
| Maximum Transmission Unit (MTU) | Set the PPPoE client maximum transmission unit (MTU) from 500 - 1,492. The MTU is the largest physical packet size in bytes a network can transmit. Any messages larger than the MTU are divided into smaller packets before being sent. A PPPoE client should be able to maintain its point-to-point connection for this defined MTU size. The default MTU is 1,492. |
| Client Idle Timeout | Set a timeout in either Seconds (1 - 65,535), Minutes (1 - 1,093) or Hours (1-18). The access point uses the defined timeout so it does not sit idle waiting for input from the PPPoE client and server that may never come. The default setting is 10 minutes. |
| Keep Alive | Select this option to ensure that the point-to-point connection to the PPPoE client is continuously maintained and not timed out. This setting is disabled by default. |
NAT converts an IP address in one network to a different IP address or set of IP addresses in another network. The access point router maps its local (Inside) network addresses to WAN (Outside) IP addresses, and translates the WAN IP addresses on incoming packets to local IP addresses. NAT is useful because it allows the authentication of incoming and outgoing requests, and minimizes the number of WAN IP addresses needed when a range of local IP addresses is mapped to each WAN IP address. The default setting is None (neither inside nor outside).
| Inbound IP Firewall Rules | Select a firewall (set of IP access connection rules) to apply to the PPPoE client connection. If there is no firewall rule that meets the data protection needs of the PPPoE client connection, select the Create icon to define a new rule configuration or the Edit icon to modify an existing rule. For more information, see Wireless Firewall. |
| VPN Crypto Map | Use the drop-down menu to apply an existing crypto map configuration to this PPPoE interface. |
 Print
this page
Print
this page Email this topic
 Feedback
 View PDF
 Download EPUB