Forwarding Database Configuration
An Forwarding Database forwards or filter packets on behalf of the
managing controller, service platform or access point. The bridge reads the packet's
destination MAC address and decides to either forward the packet or drop (filter)
it. If it's determined the destination MAC is on a different network segment, it
forwards the packet to the segment. If the destination MAC is on the same network
segment, the packet is dropped (filtered). As nodes transmit packets through the
bridge, the bridge updates its forwarding database with known MAC addresses and
their locations on the network. This information is then used to decide to filter or
forward the packet.
To define a forwarding
database configuration:
-
Select the tab from the Web UI.
-
Expand the Network menu and
select Forwarding
Database.
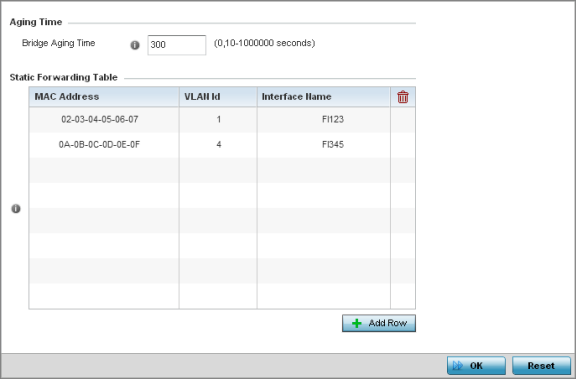
Network - Forwarding
Database screen
-
Define the Bridge Aging Time
from 0, 10-1,000,000 seconds.
The aging time defines the
length of time an entry will remain in the bridge‘s forwarding table before it
is deleted due to lack of activity. If an entry replenishments a destination,
generating continuous traffic, this timeout value will never be invoked.
However, if the destination becomes idle, the timeout value represents the
length of time that must be exceeded before an entry is deleted from the
forwarding table. The default setting is 300 seconds.
-
Use the +Add Row button
to create a new row within the Static Forwarding
Table.
-
Set or override a destination
MAC
Address.
The bridge reads the packet's
destination MAC address and decides to forward the packet or drop (filter) it.
If it's determined the destination MAC is on a different network, it forwards
the packet to the segment. If the destination MAC is on the same network
segment, the packet is dropped (filtered).
-
Define the target VLAN ID if the
destination MAC is on a different network segment.
-
Provide an Interface Name
used as the target destination interface for the target MAC address.
-
Select OK to save the
changes. Select Reset to revert to the last saved configuration.
 Print
this page
Print
this page Email this topic
 Feedback
 View PDF
 Download EPUB