To configure the VLAN IPv6 RA Prefixes configuration:
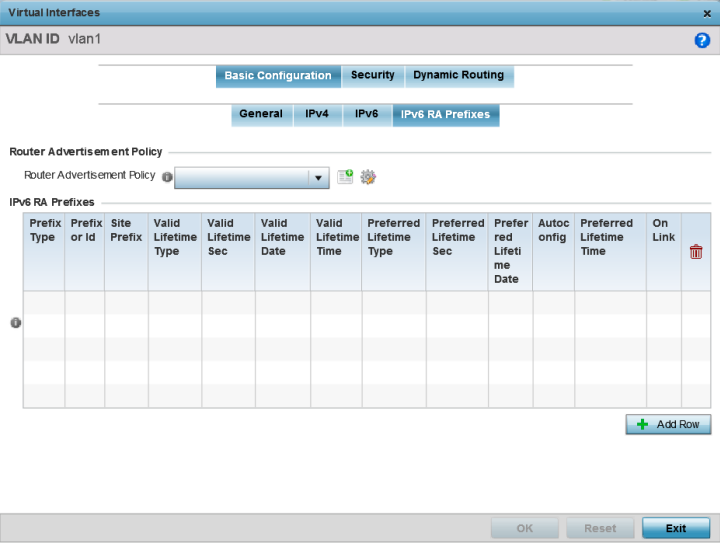
Router advertisements are periodically sent to hosts or sent in response to solicitation requests. The advertisement includes IPv6 prefixes and other subnet and host information.
If necessary, select + Add Row to define the configuration for an additional IPv6 RA prefix.
|
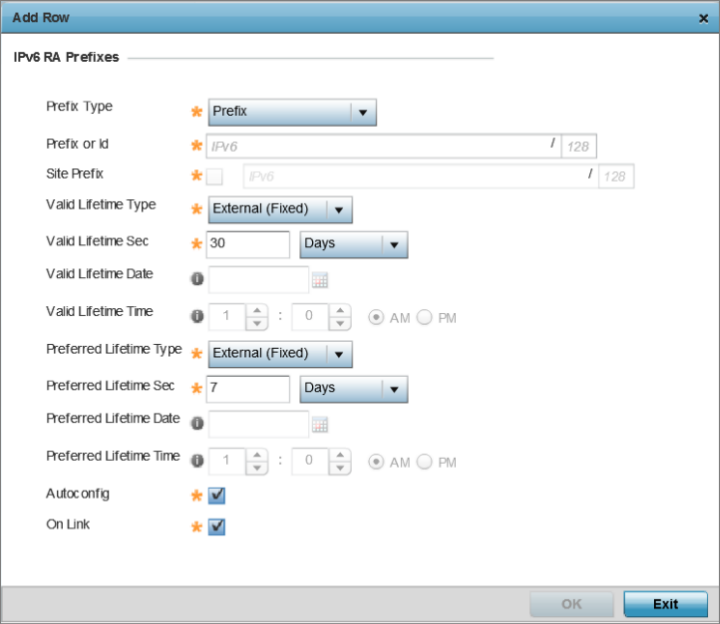
Prefix Type |
Set the prefix delegation type used with this configuration. Options include Prefix, and prefix-from-provider. The default setting is Prefix. A prefix allows an administrator to associate a user defined name to an IPv6 prefix. A provider assigned prefix is made available from an ISP (Internet Service Provider) to automate the process of providing and informing the prefixes used. |
|
Prefix or ID |
Set the actual prefix or ID used with the IPv6 router advertisement. |
|
Site Prefix |
The site prefix is added into a router advertisement prefix. The site address prefix signifies the address is only on the local link. |
|
Valid Lifetime Type |
Set the lifetime for the prefix's validity. Options include External (fixed), decrementing, and infinite. If set to External (fixed), only the Valid Lifetime Sec setting is enabled to define the exact time interval for prefix validity. If set to decrementing,, use the lifetime date and time settings to refine the prefix expiry period. If set to infinite, no additional date or time settings are required for the prefix and the prefix will not expire. The default setting is External (fixed). |
|
Valid Lifetime Sec |
If the lifetime type is set to External (fixed), set the Seconds, Minutes, Hours, or Days values used to measure the prefix's expiration. 30 days, 0 hours, 0 minutes, and 0 seconds is the default lifetime. |
|
Valid Lifetime Date |
If the lifetime type is set to External (fixed), set the date in MM/DD/YYYY format for the expiration of the prefix. |
|
Valid Lifetime Time |
If the lifetime type is set to decrementing, set the time for the prefix's validity. Use the spinner controls to set the time in hours and minutes. Use the AM and PM radio buttons to set the appropriate hour. |
|
Preferred Lifetime Type |
Set the administrator preferred lifetime for the prefix's validity. Options include External (fixed), decrementing, and infinite. If set to External (fixed), only the Preferred Lifetime Sec setting is enabled to define the exact time interval for prefix validity. If set to decrementing,, use the lifetime date and time settings to refine the prefix expiry period. If set to infinite, no additional date or time settings are required for the prefix and the prefix will not expire. The default setting is External (fixed). |
|
Preferred Lifetime Sec |
If the administrator preferred lifetime type is set to External (fixed), set the Seconds, Minutes, Hours, or Days values used to measure the prefix's expiration. 30 days, 0 hours, 0 minutes, and 0 seconds is the default lifetime. |
|
Preferred Lifetime Date |
If the administrator preferred lifetime type is set to External (fixed), set the date in MM/DD/YYYY format for the expiration of the prefix. |
|
Preferred Lifetime Time |
If the administrator preferred lifetime type is set to decrementing, set the time for the prefix's validity. Use the spinner controls to set the time in hours and minutes. Use the AM and PM radio buttons to set the appropriate hour. |
|
Autoconfig |
Autoconfiguration includes generating a link-local address, global addresses via stateless address autoconfiguration and duplicate address detection to verify the uniqueness of the addresses on a link. This setting is enabled by default. |
|
On Link |
Select this option to keep the IPv6 RA prefix on the local link. The default setting is enabled. |
Click Exit to close the screen without saving any updates. Or, click Reset to revert to the last saved configuration.
 Print
this page
Print
this page Email this topic
 Feedback
 View PDF
 Download EPUB