Profile Services Configuration
A profile can contain specific guest access (captive portal), DHCP server and RADIUS
server configurations supported by the controller, service platform or access
point‘s own internal resources. These access, IP assignment and user authorization
resources can be defined uniquely as profile requirements dictate.
Before defining a profile‘s captive portal and DHCP configuration, refer to the
following deployment guidelines to ensure the profile configuration is optimally
effective:
- A profile plan should consider the number of wireless clients allowed on the
profile‘s guest (captive portal) network and the services provided, or if
the profile should support guest access at all.
- Profile configurations supporting a captive portal should include firewall
policies to ensure logical separation is provided between guest and internal
networks so internal networks and hosts are not reachable from guest
devices.
- DHCP‘s lack of an authentication mechanism means a DHCP server supported
profile cannot check if a client or user is authorized to use a given user
class. This introduces a vulnerability when using user class options. Ensure
a profile using DHCP resources is also provisioned with a strong user
authorization and validation configuration.
To define a profile‘s services configuration:
-
Select .
Profile Services -
Services Screen
-
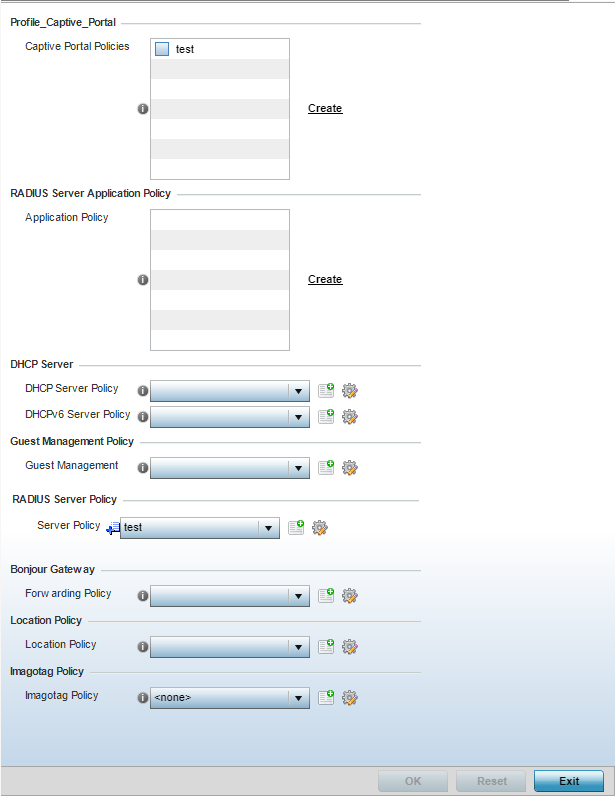
Refer to the Profile_Captive_Portal field to select or set a guest access
configuration (captive portal) for use with this profile.
Captive portals are access policies that provide guests temporary and
restrictive access to the managed network.
A captive portal is a browser-based authentication mechanism that forces
unauthenticated users to a web page. Captive portals capture and re-direct a wireless user's
web-browser session to a captive portal login page where the user must enter valid credentials
to access the wireless network. Once logged into the captive portal, additional
Acknowledgment, Agreement, Welcome, No Service and Fail
customized pages enhance screen flow and user experience.
-
Select an existing captive
portal policy.
Use the
Create
or
Edit icons to create a new captive portal
policy or edit an existing policy. For more information, see
Captive Portal Policies.
-
Use the RADIUS Server Application Policy drop-down menu
to select an application policy to authenticate users and authorize access to
the network.
This feature is not supported on WiNG 7.X.X devices (access point and service
platforms).
-
Use the DHCP Server Policy drop-down menu assign this
profile a DHCP server policy. If an existing DHCP policy does not meet the
profile‘s requirements, click the Create icon to create a new policy
configuration that can be applied to this profile, or click the Edit icon to
modify the parameters of an existing DHCP Server policy.
Dynamic Host Configuration
Protocol (DHCP) allows hosts on an IP network to request and be assigned IP addresses
as well as discover information about the network where they reside. Each subnet can be
configured with its own address pool. Whenever a DHCP client requests an IP address, the DHCP
server assigns an IP address from that subnet‘s address pool. When the onboard DHCP server
allocates an address for a DHCP client, the client is assigned a lease, which expires after an
predetermined interval. Before a lease expires, wireless clients (to which leases are
assigned) are expected to renew them to continue to use the addresses. When the lease expires,
the client is no longer permitted to use the leased IP address. The profile‘s DHCP server
policy ensures all IP addresses are unique, and no IP address is assigned to a second client
while the first client's assignment is valid (its lease has not expired).
.
-
Use the DHCPv6 Server Policy drop-down menu assign this
profile a DHCPv6 server policy. If an existing DHCP policy for IPv6 does not
meet the profile‘s requirements, click the Create icon to create a new policy
configuration that can be applied to this profile, or click the Edit icon to
modify the parameters of an existing DHCP Server policy.
DHCPv6 is a networking protocol for configuring IPv6 hosts with IP addresses, IP
prefixes, or other configuration attributes required on an IPv6 network. DHCP in IPv6 works in
with IPv6 router discovery. With the proper RA flags, DHCPv6 works like DHCP for IPv4. The
central difference is the way a device identifies itself if assigning addresses manually
instead of selecting addresses dynamically from a pool.
Use the Create or Edit icons to
create a new DHCPv6 server policy or edit an existing policy.
-
Use the RADIUS Server Policy drop-down menu to select an
existing RADIUS server policy to use as a user validation security mechanism
with this profile.
A profile can have its own
unique RADIUS server policy to authenticate users and authorize access to the
network. A profile‘s RADIUS policy provides the centralized management of
controller or service platform authentication data (usernames and passwords).
When an client attempts to associate, an authentication request is sent to the
RADIUS server. Use the Create or
Edit icons to create a new RADIUS server policy or
edit an existing policy.
-
Refer to the Bonjour Gateway field to select or set a
Bonjour Gateway Forwarding Policy.
Bonjour is Apple‘s implementation of zero-configuration networking (Zeroconf).
Zeroconf is a group of technologies that include service discovery, address assignment and
hostname resolution. Bonjour locates devices such as printers, other computers and services
that these computers offer over a local network. Bonjour provides a general method to discover
services on a LAN. It allows users to set up a network without any configuration. Services
such as printers, scanners and filesharing servers can be found using Bonjour. Bonjour only
works within a single broadcast domain. However, with special DNS configuration, it can be
extended to find services across broadcast domains.
Bonjour Forwarding Policy enables discovery of services on VLANs which are
not visible to the device running the Bonjour Gateway. Bonjour forwarding
enables forwarding of Bonjour advertisements across VLANs to enable the
Bonjour Gateway device to build a list of services and the VLANs where these
services are available.
-
Use the Location Policy
drop-down menu to select and apply a location policy to the
controller/virtual controller. The location policy provides the ExtremeLocation
server's hostname and ExtremeLocation tenant's location API key. This
information is required by the controller to authenticate and authorize with the
ExtremeLocation server. Use the Create or
Edit
icons to create a new policy or edit an existing policy.
-
Refer to the Imagotag Policy
field to select or set a Imagotag Policy. Use the drop-down menu to select and
apply an Imagotag Policy to the AP's profile. You can use the Create to create
a new policy or Edit icon to edit an existing policy. The Imagotag feature is
supported only on the AP-8432 model access
point.
For more information on
enabling support for SES-imagotag‘s ESL tags on
AP-8432 APs with USB
interfaces, see
Setting the Imagotag Policy.
-
Select OK to save the changes made to the profile‘s
services configuration. Select Reset to revert to the
last saved configuration.
 Print
this page
Print
this page Email this topic
 Feedback
 View PDF
 Download EPUB