A user‘s access request is sent to a proxy server if it cannot be authenticated by local RADIUS resources. The proxy server checks the information in the user access request, and either accepts or rejects the request. If the proxy server accepts the request, it returns configuration information specifying the type of connection service required to authenticate the user.
The RADIUS proxy appears to act as a RADIUS server to the NAS, whereas the proxy appears to act as a RADIUS client to the RADIUS server.
When the access point‘s RADIUS server receives a request for a user name containing a realm, the server references a table of configured realms. If the realm is known, the server proxies the request to the RADIUS server. The behavior of the proxying server is configuration-dependent on most servers. In addition, the proxying server can be configured to add, remove or rewrite requests when they are proxied.
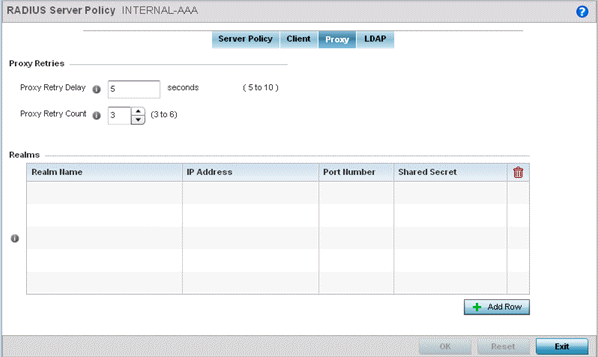
This is the interval the RADIUS server waits before making an additional connection attempt. The default delay interval is 5 seconds.
This is the number of retries sent to the proxy server before giving up the request. The default retry count is 3 attempts.
To delete a proxy server entry, select the Delete icon on the right-hand side of the table.
The realm name cannot exceed 50 characters. When the access point's RADIUS server receives a request for a user name, the server references a table of realms. If the realm is known, the server proxies the request to the RADIUS server.
This is the address of server checking the information in the user access request. The proxy server either accepts or rejects the request on behalf of the RADIUS server.
Use the spinner to select a value from 1024 - 65535. The default port is 1812.
Select the Show checkbox to expose the shared secret's actual character string. Otherwise, the shared secret is displayed as a string of asterisks (*).
Click Reset to revert to the last saved configuration.
 Print
this page
Print
this page Email this topic
 Feedback
 View PDF
 Download EPUB