Refer to the RSA Keys screen to review existing RSA key configurations applied to managed devices. If an existing key does not meet the needs of a pending certificate request, generate a new key or import or export an existing key to and from a remote location.
RSA (Rivest, Shamir, and Adleman) is an algorithm for public key cryptography. It is an algorithm that can be used for certificate signing and encryption. When a device trustpoint is created, the RSA key is the private key used with the trustpoint.
To review existing device RSA key configurations, generate additional keys or import/export keys to and from remote locations:
The Certificate Management screen displays, with the Manage Certificates tab selected by default. This screen displays all existing trustpoints.
The RSA Keys management screen displays.
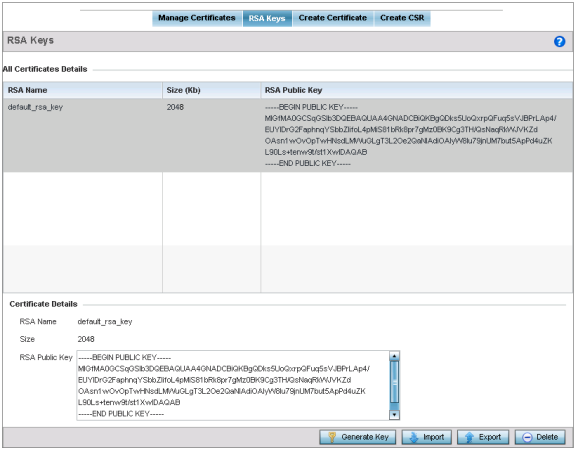
Each key can have its size and character syntax displayed. Once reviewed, optionally generate a new RSA key, import a key from a selected device, export a key to a remote location or delete a key from a selected device.
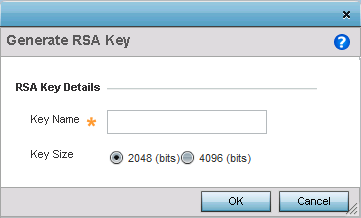
The generate RSA key window displays.
|
Key Name |
Enter the 32 character maximum name assigned to the RSA key. |
|
Key Size |
Use the spinner control to set the size of the key (from 2,048 or 4096 bits). It is recommended leaving this value at the default setting of 2048 to ensure optimum functionality. |
Select Cancel to revert the screen to its last saved configuration.
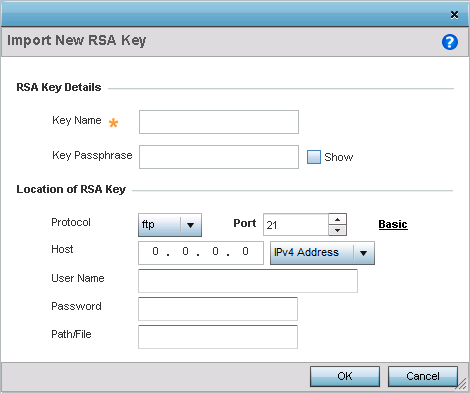
The import RSA Key window displays.
|
Key Name |
Enter the 32 character maximum name assigned to the RSA key. |
|
Key PassPhrase |
Define the key used by both the access point and the server (or repository) of the target RSA key. Select the Show option to expose the actual characters used in the passphrase. Leaving the Show option unselected displays the passphrase as a series of asterisks “*”. |
|
URL |
Provide the complete URL to the location of the RSA key. This option is only available when the Basic link is clicked. |
|
Protocol |
If using Advanced settings, select the
protocol used for importing the target trustpoint.
Available options include:
|
|
Port |
If selecting Advanced, use the spinner control to set the port. This option is not valid for cf, usb1, usb2, usb3 and usb4. |
|
Host |
If selecting Advanced, provide the hostname of the server used to import the RSA key. Select IPv4 Address or IPv6 Address to provide the IP address of a host device appropriately. This option is not valid for cf, usb1, usb2, usb3 and usb4. |
|
Username/Password |
These fields are enabled if using ftp or sftp protocols,. Specify the username and the password for that username to access the remote servers using these protocols. |
|
Path/File |
If selecting Advanced, specify the path to the RSA key. Enter the complete relative path to the key on the server. |
Select Cancel to revert the screen to its last saved configuration.
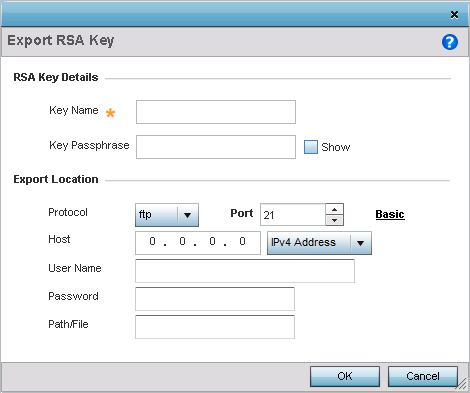
Export the key to a RADIUS server so it can be imported without generating a second key. If there are more than one RADIUS authentication server, export the certificate and do not generate a second key unless you want to deploy two root certificates.
The export RSA Keys window displays.
|
Key Name |
Enter the 32 character maximum name assigned to the RSA key. |
|
Key Passphrase |
Define the key passphrase used by both the access point and the server. Select the Show option to expose the actual characters used in the passphrase. Leaving the Show option unselected displays the passphrase as a series of asterisks “*”. |
|
URL |
Provide the complete URL to the location of the key. This option is only available when the Basic link is clicked. |
|
Protocol |
If using Advanced settings, select the
protocol used for importing the target trustpoint.
Available options include:
|
|
Port |
If selecting Advanced, use the spinner control to set the port. This option is not valid for cf, usb1, usb2, usb3 and usb4. |
|
Host |
If selecting Advanced, provide the hostname of the server used to import the RSA key. Select IPv4 Address or IPv6 Address to provide the IP address of a host device appropriately. This option is not valid for cf, usb1, usb2, usb3 and usb4. |
|
Username/Password |
These fields are enabled if using ftp or sftp protocols,. Specify the username and the password for that username to access the remote servers using these protocols. |
|
Path/File |
If selecting Advanced, specify the path to the RSA key. Enter the complete relative path to the key on the server. |
Select Cancel to revert the screen to its last saved configuration.
To optionally delete a key, select the Delete button from within the RSA Keys screen. Provide the key name within the Delete RSA Key screen and select the Delete Certificates option to remove the certificate and the supported key. Select OK to proceed with the deletion, or Cancel to revert back to the Certificate Management screen.
 Print
this page
Print
this page Email this topic
 Feedback
 View PDF
 Download EPUB