MiNT provides the means to secure profile communications at the transport layer. Using MiNT, a device can be configured to only communicate with other authorized (MiNT enabled) devices. Keys can also be generated externally using any application (like openssl). These keys must be present on the device managing the domain for key signing to be integrated with the UI. A device needing to communicate with another first negotiates a security context with that device.
The security context contains the transient keys used for encryption and authentication. A secure network requires users to know about certificates and PKI. However, administrators do not need to define security parameters for Access Points to be adopted (secure WISPe being an exception, but that isn‘t a commonly used feature). Also, users can replace any device on the network or move devices around and they continue to work. Default security parameters for MiNT are such that these scenarios continue to function as expected, with minimal user intervention required only when a new network is deployed
To define or override a profile's MiNT configuration:
A list of default and user-created profiles is displayed.
The selected profile's configuration menu is displayed.
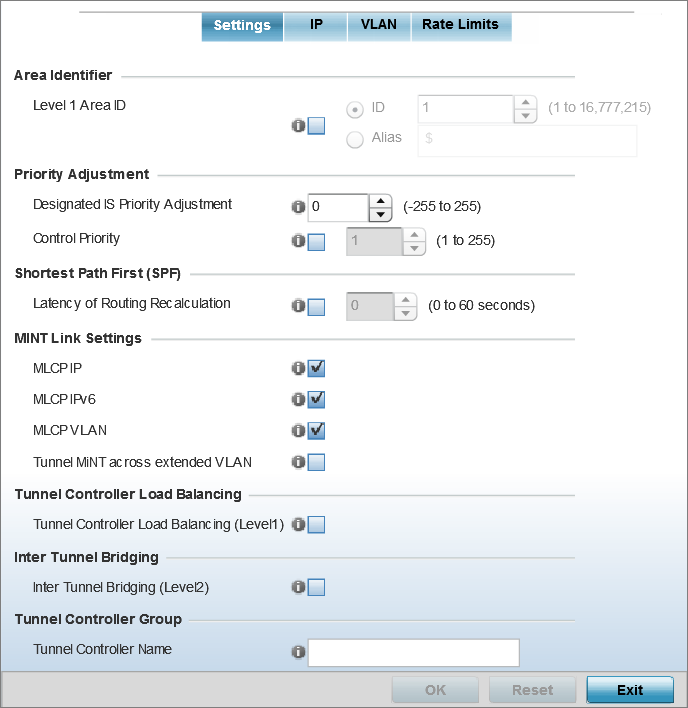
The Settings tab displays by default.
|
Level 1 Area ID |
Select this option to enable a spinner control for setting the Level 1 Area ID from 1 - 16,777,215. The default value is disabled. Alternatively, provide an alias by selecting the Alias option and adding the alias name to this field. |
|
Designated IS Priority Adjustment |
Use the spinner control to set a Designated IS Priority Adjustment setting from -255 - +255. This is the value added to the base level DIS priority to influence the Designated IS (DIS) election. A value of +1 or greater increases DISiness. The default setting is 0. |
The option is disabled by default.
|
MLCP IP |
Select this option to enable MLCP (MiNT Link Creation Protocol) by IP Address. MLCP is used to create a UDP/IP link from the device to a neighbor. The neighboring device can be another AP. |
|
MLCP IPv6 |
Select this option to enable MiNT Link Creation Protocol (MLCP) by IPv6 Address. MLCP by IPv6 is used to create one UDP/IP link from the device to a neighbor. The neighboring device does not need to be a virtual controller; it can be an standalone access point. |
|
MLCP VLAN |
Select this option to enable MiNT MLCP by VLAN. MLCP is used to create one VLAN link from the device to a neighbor. The neighboring device can be another AP. |
|
Tunnel MiNT across extended VLAN |
Select this option to tunnel MiNT protocol packets across an extended VLAN. This setting is disabled by default. |
This setting is disabled by default.
This setting is disabled by default.
Click Reset to revert to the last saved configuration.
 Print
this page
Print
this page Email this topic
 Feedback
 View PDF
 Download EPUB