A pool (or range) of IP network addresses and DHCP options can be created for each IP interface configured. This range of addresses can be made available to DHCP enabled wireless devices on either a permanent or leased basis. DHCP options are provided to each DHCP client with a DHCP response and provide DHCP clients information required to access network resources (default gateway, domain name, DNS server and WINS server configuration). An option exists to identify the vendor and functionality of a DHCP client. The information is a variable-length string of characters (or octets) with a meaning specified by the vendor of the DHCP client.
To define the parameters of a DHCP pool:
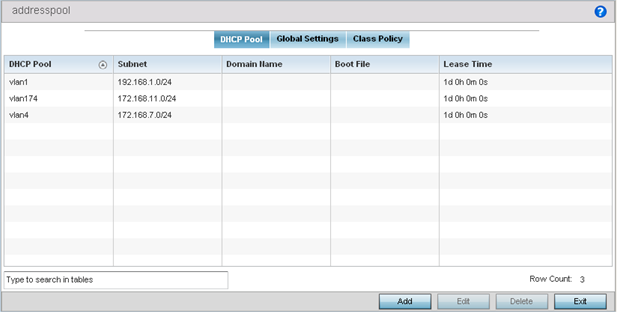
| DHCP Pool | Displays the name assigned to the network pool when created. The DHCP pool name represents the group of IP addresses used to assign to DHCP clients upon request. The name assigned cannot be modified as part of the edit process. However, if the network pool configuration is obsolete it can be deleted. |
| Subnet | Displays the network address and mask used by clients requesting DHCP resources. |
| Domain Name | Displays the domain name defined used with this network pool. Domain Name Services (DNS) converts human-readable host names into IP addresses. Host names are not case sensitive and can contain alphabetic or numeric letters or a hyphen. A fully qualified domain name (FQDN) consists of a host name plus a domain name. For example, computername.domain.com. |
| Boot File | Boot files (Boot Protocol) are used to boot remote systems over the network. BOOTP messages are encapsulated inside UDP messages, so requests and replies can be forwarded. Each DHCP network pool can use a different file as needed. |
| Lease Time | If a lease time has been defined for a listed network pool, it displays in an interval from 1 - 9,999,999 seconds. DHCP leases provide addresses for defined times to various clients. If a client does not use the leased address for the defined time, that IP address can be re-assigned to another requesting DHCP client. |
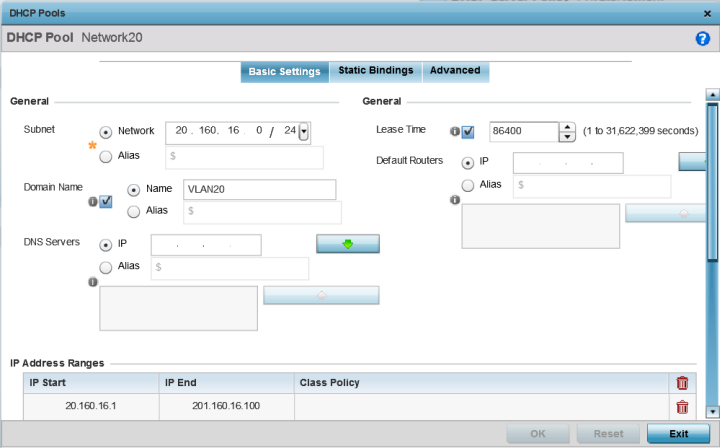
If you are adding or editing a DHCP pool, the DHCP Pool screen displays the Basic Settings tab by default. Define the required parameters for the Basic Settings, Static Bindings and Advanced tabs to complete the creation of the DHCP pool.
| DHCP Pool | If adding a new pool, a name is required. The pool is the range of IP addresses defined for DHCP assignment or lease. The name assigned cannot be modified as part of the edit process. However, if the network pool configuration is obsolete it can be deleted. The name cannot exceed 32 characters. |
| Subnet | Define the IP address/Subnet Mask
or IP alias used for DHCP discovery and requests between the
local DHCP server and clients. The IP address and subnet
mask (or its alias) are required to match the addresses of
the layer 3 interface for the addresses to be supported
through that interface. Select Alias to use a network alias with the subnet configuration. For more information, see Alias. |
| Domain Name | Provide the domain name or domain
alias used with this pool. Domain names are not case
sensitive and can contain alphabetic or numeric letters or a
hyphen. A fully qualified domain
name (FQDN) consists of a host name plus a domain
name. For example, computername.domain.com. Select Alias to use a string alias with the domain name configuration. For more information, see Alias. |
| DNS Servers | Define one (or a group) of Domain
Name Servers (DNS) to translate domain names to IP
addresses. Select Clear to remove any single IP address as needed. Up to eight IP addresses can be supported. Select Alias to use a host alias with the DNS servers configuration. For more information, see Alias. |
| Lease Time | DHCP leases provide addresses for defined times to various clients. If a client does not use the leased address within the defined time, that IP address can be re-assigned to another DHCP supported client. Select this option to assign a lease in either Seconds (1 - 31,622,399), Minutes (1 - 527,040), Hours (1 - 8,784) or Days (1 - 366). The default setting is enabled, with a lease time of 1 day. |
| Default Routers | After a DHCP client has booted,
the client begins sending packets to its default router. Set
the IP address or IP alias for one or more routers used to
map host names into IP addresses for clients. Up to eight
default router IP addresses are supported. If setting a
default router IP alias, ensure it begins with a dollar sign
($) and does not exceed 32 characters. An actual router IP
address is the default setting, not an alias. Select Alias to use a hoast alias with the default routers configuration. For more information, see Alias. |
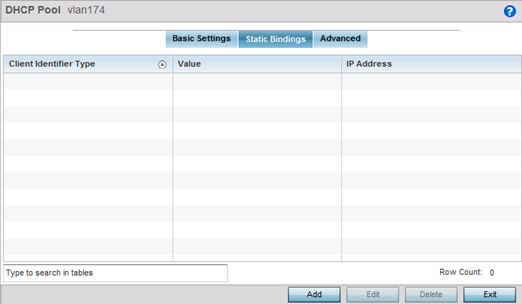
| Client Identifier Type | Whether the reporting client is using a hardware address or client identifier as its identifier type within requests to the DHCP server. |
| Value | The hardware address or client identifier assigned to the client when added or last modified. |
| IP Address | The IP address of the client on this interface that‘s currently using the pool name listed. |
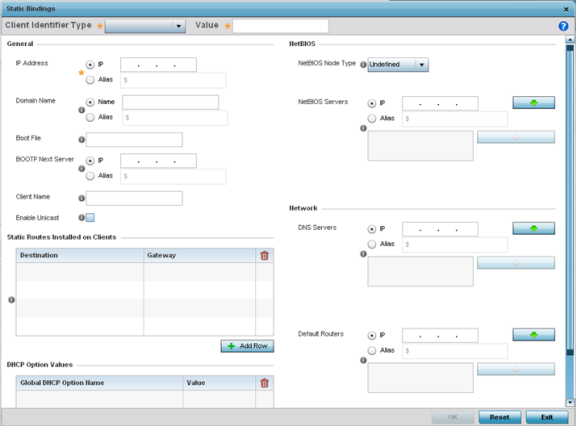
| Client Identifier Type | Use the drop-down menu whether the DHCP client is using a Hardware Address or Client Identifier as its identifier type with a DHCP server. |
| Value | Provide a hardware address or client identifier value to help differentiate the client from other client identifiers. |
| IP Address |
Set the IP address of the client using this host pool. Select Alias to use a network alias with the IP address configuration. For more information, see Alias. |
| Domain Name | Provide a domain name for the current interface. Domain names
are not case sensitive and can contain letters, numbers, and
hyphens. A fully qualified
domain name (FQDN) consists of a host name plus a
domain name. For example, computername.domain.com. Select Alias to use a string alias with the domain name configuration. For more information see Alias. |
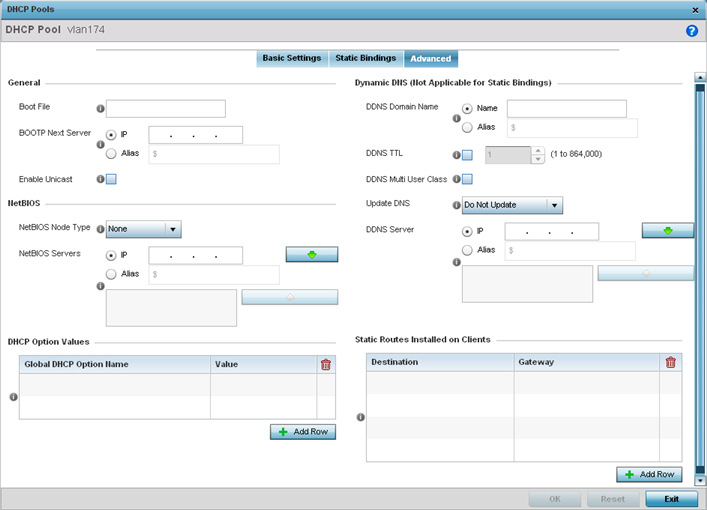
| Boot File | Enter the name of the boot file used with this pool. Boot files (Boot Protocol) can be used to boot remote systems over the network. BOOTP messages are encapsulated inside UDP messages so requests and replies can be forwarded. Each DHCP network pool can use a different file as needed. |
| BOOTP Next Server | Provide the numerical IP address or alias of the server
providing BOOTP resources. Select Alias to use a network alias with the BOOTP Next Server configuration. For more information see Alias. |
| Client Name | Provide the name of the client requesting DHCP Server support. |
| Enable Unicast | Unicast packets are sent from one location to another location (there is just one sender and one receiver). Select this option to forward unicast messages to just a single device within this network pool. This setting is disabled by default. |
| NetBIOS Node Type | Set the NetBIOS Node Type used
with this particular pool. The following options are
available:
|
| NetBIOS Servers | Specify a numerical IP address of a single NetBIOS WINS
server or a group of servers available to requesting
clients. A maximum of eight server IP addresses can be
assigned. Select Alias to use a network alias with the NetBIOS server configuration. For more information see Alias. |
Select Alias to use a network alias with the DNS server configuration.. For more information see Alias.
| Boot File | Enter the name of the boot file used with this pool. Boot files (boot protocol) can be used to boot remote systems over the network. BOOTP messages are encapsulated inside UDP messages so requests and replies can be forwarded. Each pool can use a different file as needed. |
| BOOTP Next Server | Provide the numerical IP address
or alias of the server providing BOOTP resources. Select Alias to use a network alias with the BOOTP Next Server configuration. For more information see Alias. |
| Enable Unicast | Unicast packets are sent from one location to another location (there's just one sender, and one receiver). Select this option to forward unicast messages to just a single device within the network pool. This setting is disabled by default. |
| NetBIOS Node Type | Set the NetBIOS Node Type used
with this particular pool. The following options are
available:
|
| NetBIOS Servers | Specify a numerical IP address of
a single NetBIOS WINS server or a group of servers
available to requesting clients. A maximum of eight server
IP addresses can be assigned. Select Alias to use a network alias with the NetBIOS server configuration. For more information see Alias. |
| DDNS Domain Name | Enter a domain name for DDNS updates representing the forward zone in the DNS server. For example, test.net. The Name option is selected by default. Optionally select Alias to provide a DDNS domain name alias beginning with a dollar sign ($) and not exceeding 32 characters. |
| DDNS TTL | Select this option to set a TTL (Time to Live) to specify the validity of DDNS records. The maximum value configurable is 864000 seconds. |
| DDNS Multi User Class | Select the check box to associate the user class option names with a multiple user class. This allows the user class to transmit multiple option values to DHCP servers supporting multiple user class options. |
| Update DNS | Set if DNS is updated from a client or a server. Select either Do Not Update, Update from Server, or Update from Client. The default setting is Do Not Update, implying that no DNS updates occur at all. |
| DDNS Server | Specify a numerical IP address of one or two DDNS servers. Dynamic DNS (DDNS) prompts a computer or network to obtain a new IP address lease and dynamically associate a hostname with that address, without having to manually enter the change every time. Since there are situations where an IP address can change, it helps to have a way of automatically updating hostnames that point to the new address every time. The IP option is selected by default. Optionally select Alias to provide a DDNS server IP alias beginning with a dollar sign ($) and not exceeding 32 characters. |
 Print
this page
Print
this page Email this topic
 Feedback
 View PDF
 Download EPUB