Refer to the advanced profile‘s Miscellaneous menu item to set or override a profile‘s NAS configuration. The profile database on the RADIUS server consists of user profiles for each connected network access server (NAS) port. Each profile is matched to a username representing a physical port.
Access point LED behavior and RF Domain management can also be defined from the Miscellaneous screen.
To define or override a profile's miscellaneous configuration attributes:
A list of default and user-created profiles is displayed.
The selected profile's configuration menu is displayed.
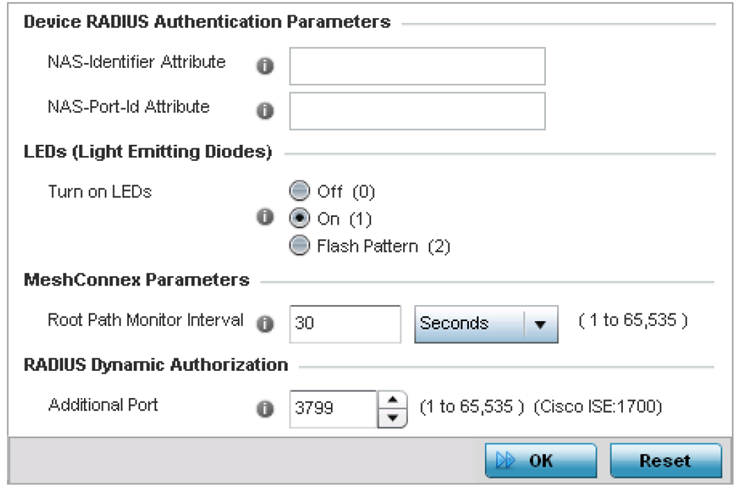
This is the RADIUS NAS-Identifier attribute that typically identifies where a RADIUS message originates.
This is the RADIUS NAS port ID attribute which identifies the device port where a RADIUS message originates.
This feature is enabled by default.
Enabling this option allows an administrator to validate that the access point has received its configuration from its managing controller during staging. In the staging process, the administrator adopts the access point to a staging controller to get an initial configuration before the access point is deployed at its intended location. Once the access point has received its initial configuration, its LED blinks in a unique pattern to indicate the initial configuration is complete.
This field configures the access point‘s mobility behavior. The default is External (fixed), which means that the mesh point is fixed. The value vehicle-mounted means that the mesh point is mobile. This feature is available only on an AP 7161 model access point.
The default value is enabled.
Once enabled, use the spinner control to set a device priority between 1 - 255. The higher the number you select, the higher the priority in the RF Domain manager election process.
Set this value to 1700. The allowed port range is 1 to 65,535.
When a client device requests access to the network, the Cisco ISE RADIUS server presents the client with a URL where a device‘s compliance is checked for definition file validity (this form of file validity checking is called posture). The check verifies, for example, that the device's anti-virus or anti-spyware software is valid. If the device complies, it is allowed access to the network.
Click Reset to revert to the last saved configuration.
 Print
this page
Print
this page Email this topic
 Feedback
 View PDF
 Download EPUB