You can add a new VRRP configuration or edit an existing configuration to match changing network requirement.
Click Edit to modify or override the attributes of a existing VRRP configuration. If necessary, existing VRRP configurations can be selected and permanently removed by clicking Delete.
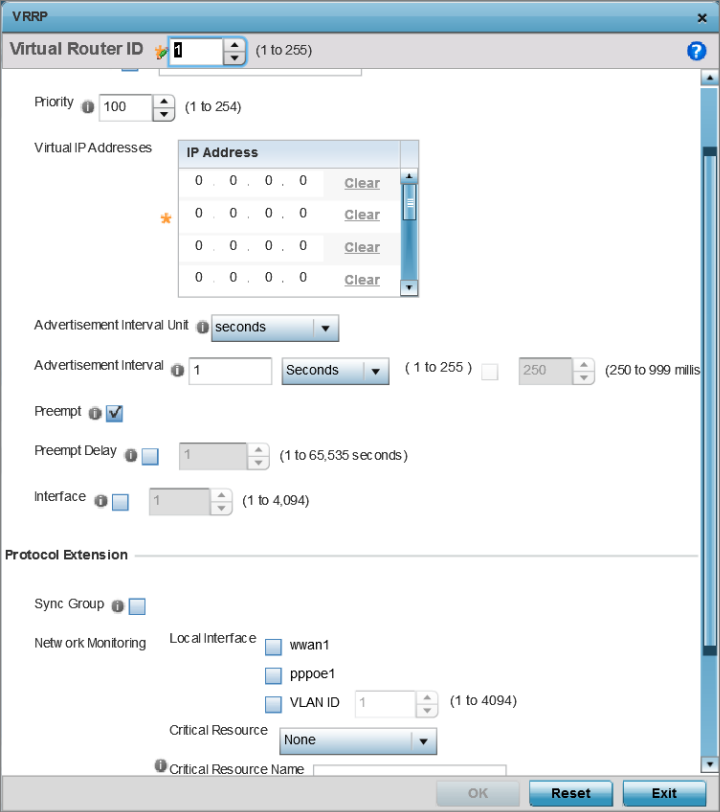
In addition to functioning as numerical identifier, the ID identifies the virtual router for which a packet is reporting status.
|
Description |
In addition to an ID assignment, a virtual router configuration can be assigned a textual description (up to 64 characters) to further distinguish it from others with a similar configuration. |
|
Priority |
Use the spinner control to set a VRRP priority setting from 1 - 254. The controller or service platform uses the defined setting as criteria in selection of a virtual router master. The higher the value, the greater the likelihood of this virtual router ID being selected as the master. |
|
Virtual IP Addresses |
Provide up to eight IP addresses representing the Ethernet switches, routers, or security appliances defined as virtual router resources. |
|
Advertisement Interval Unit |
Select either seconds, milliseconds or centiseconds as the unit used to define VRRP advertisements. After an option is selected, the spinner control becomes enabled for that Advertisement Interval option. The default interval unit is seconds. If you are changing the VRRP group version from 2 to 3, the advertisement interval must be in centiseconds. Use VRRP group version 2 when the advertisement interval is either in seconds or milliseconds. |
|
Advertisement Interval |
After selecting an Advertisement Interval Unit , use the spinner control to set the interval the VRRP master sends out advertisements on each of its configured VLANs. The default setting is 1 second. |
|
Preempt |
Select this option to ensure a high priority backup router is available to preempt a lower priority backup router resource. The default setting is enabled. When selected, the Preempt Delay option becomes enabled to set the actual delay interval for pre-emption. This setting determines if a node with a higher priority can take over all the Virtual IPs from the nodes with a lower priority. |
|
Preempt Delay |
If the Preempt option is selected, use the spinner control to set the delay interval (in seconds) for preemption. |
|
Interface |
Select this value to enable or disable VRRP operation and define the VLAN (1 - 4,094) interface where VRRP will be running. These are the interfaces monitored to detect a link failure. |
|
Sync Group |
Select the option to assign a VRRP sync group to this VRRP ID‘s group of virtual IP addresses. This triggers VRRP fail over if an advertisement is not received from the virtual masters that are part of this VRRP sync group. This setting is disabled by default. |
|
Network Monitoring: Local Interface |
Select wwan1, pppoe1, and VLAN ID(s) as needed to extend VRRP monitoring to these local access point interfaces. Once selected, these interfaces can be assigned an increasing or decreasing level or priority for virtual routing in the VRRP group. |
|
Network Monitoring: Critical Resource |
Assign the priority level for the selected local interfaces. Backup virtual routers can increase or decrease their priority in case the critical resources connected to the master router fail, and then transition to the master state themselves. Additionally, the master virtual router can lower its priority if the critical resources connected to it fails, so the backup can transition to the master state. This value can only be set on the backup or master router resource, not both. Options include None, increment-priority and decrement priority. |
|
Network Monitoring: Delta Priority |
Use this setting to decrement the configured priority (by the set value) when the monitored interface is down. When critical resource monitoring is enabled, the value is incremented by the setting defined. |
Click Reset to revert to the last saved configuration.
 Print
this page
Print
this page Email this topic
 Feedback
 View PDF
 Download EPUB