Unauthorized APs are untrusted and unsanctioned access points connected to a LAN that accept client associations. They can be deployed for illegal wireless access to a corporate network, implanted with malicious intent by an attacker, or could just be misconfigured access points that do not adhere to corporate policies. An attacker can install a unauthorized AP with the same ESSID as the authorized WLAN, causing a nearby client to associate to it. The unauthorized AP can then steal user credentials from the client, launch a man-in-the middle attack or take control of wireless clients to launch denial-of-service attacks.
A WIPS server can be deployed as a dedicated solution within a separate enclosure. When used with associated access point radios, a WIPS deployment provides the following enterprise class security management features:
To define an access point‘s WIPS configuration:
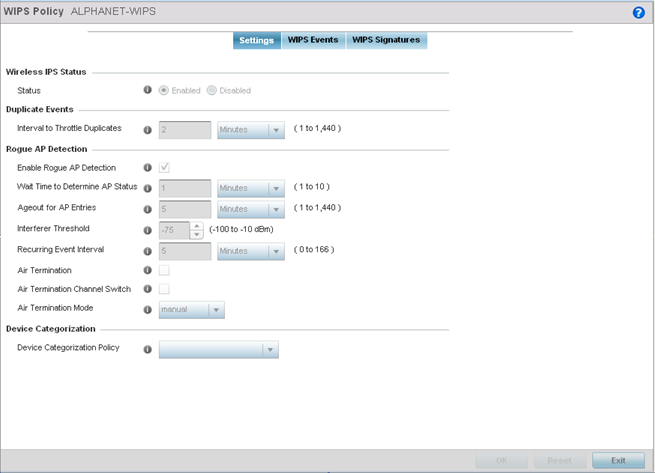
| Enable Rogue AP Detection | Select the check box to enable the detection of unsanctioned APs from this WIPS policy. The default setting is disabled. |
| Wait Time to Determine AP Status | Define a wait time in either Seconds (10 - 600) or Minutes (0 - 10) before a detected AP is interpreted as a rogue (unsanctioned) device, and potentially removed. The default interval is 1 minute. |
| Ageout for AP Entries | Set the interval the WIPS policy uses to ageout rogue devices. Set the policy in either Seconds (30 - 86,400), Minutes (0- 1,440), Hours (1 - 24) or Days (1). The default setting is 5 minutes. |
| Interferer Threshold | Specify a RSSI threshold (from -100 to -10 dBm) after which a detected access point is classified as an interferer (rogue device). |
| Recurring Event Interval | Set an interval that, when exceeded, duplicates a rogue AP event if the rogue devices is still active (detected) in the network. The default setting is 5 minutes. |
| Air Termination | Select this option to enable the termination of detected rogue AP devices. Air termination lets you terminate the connection between your wireless LAN and any access point or client associated with it. If the device is an access point, all clients dis-associated with the access point. If the device is a client, its connection with the access point is terminated. This setting is disabled by default. |
| Air Termination Channel Switch | Select this option to allow neighboring access point to switch channels for rogue AP termination. This setting is disabled by default. |
| Air Termination Mode | If termination is enabled, use the drop-down menu to specify the termination mode used on detected rogue devices. The default setting is manual. |
The Excessive tab displays by default, with additional MU Anomaly and AP Anomaly tabs also available.
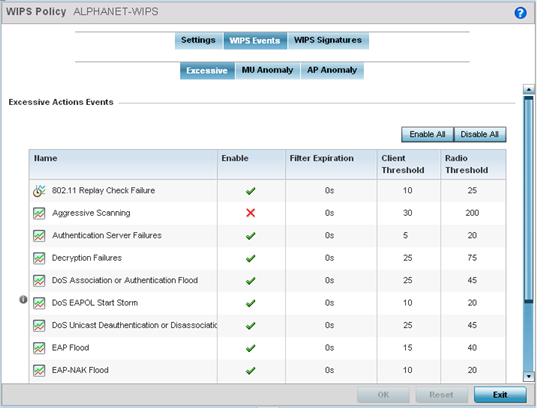
The Excessive tab lists events with the potential of impacting network performance. An administrator can enable or disable event filtering and set the thresholds for the generation of the event notification and filtering action.
An Excessive Action Event is an event where an action is performed repetitively and continuously. DoS attacks come under this category. Use the Excessive Actions Events table to select and configure the action taken when events are triggered.
| Name | Displays the name of the excessive action event representing a potential threat to the network. This column lists the event being tracked against the defined thresholds set for interpreting the event as excessive or permitted. |
| Enable | Displays whether tracking is enabled for each event. Use the drop-down menu to enable/disable events as required. A green checkmark defines the event as enabled for tracking against its threshold values. A red “X” defines the event as disabled and not tracked by the WIPS policy. Each event is disabled by default. |
| Filter Expiration | Set the duration an event generating client is filtered. This
creates a special ACL entry, and frames coming from the
client are dropped. The default setting is 0 seconds.
This value is applicable across the RF Domain. If a station is detected performing an attack and is filtered by an access point, the information is passed to the domain controller. The domain controller then propagates this information to all the access points in the RF Domain. |
| Client Threshold | Set the client threshold after which the filter is triggered and an event generated. |
| Radio Threshold | Set the radio threshold after which an event is recorded to the event history. |
Use the Enable All button to enable all Excessive Action Events. Use Disable All to disable all Excessive Action Events.
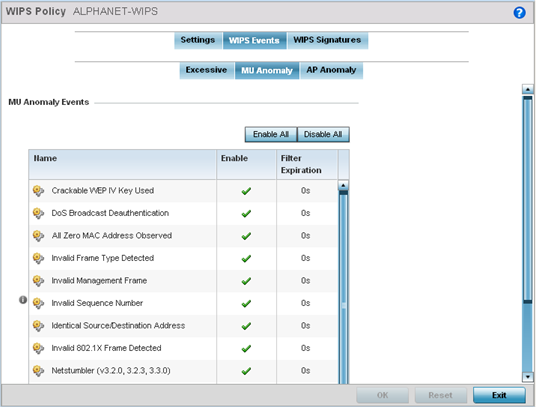
MU Anomaly events are suspicious events by wireless clients that can compromise the security and stability of the network. Use the MU Anomaly screen to set the intervals clients can be filtered upon the generation of each event.
| Name | Displays the name of the excessive action event representing a potential threat to the network. This column lists the event being tracked against the defined thresholds set for interpreting the event as excessive or permitted. |
| Enable | Displays whether tracking is enabled for each MU Anomaly event. Use the drop-down menu to enable/disable events as required. A green checkmark defines the event as enabled for tracking against its threshold. A red “X” defines the event as disabled, and not tracked by the WIPS policy. Each event is disabled by default. |
| Filter Expiration | Set the duration a client is filtered. This creates a special ACL entry, and frames coming from the client are silently dropped. The default setting is 0 seconds. For each violation, define a time to filter value (in seconds) which determines how long received packets are ignored from an attacking device once a violation has been triggered. Ignoring frames from an attacking device minimizes the effectiveness of the attack and the impact to the site until permanent mitigation can be performed. |
Use the Enable All button to enable all MU Anomaly rules. Use Disable All to disable all MU Anomaly rules.
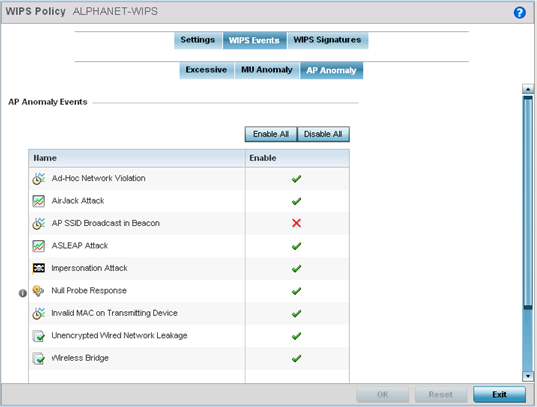
AP Anomaly events are suspicious frames sent by neighboring APs. Use the AP Anomaly tab to enable or disable an event.
| Name | Displays the name of the excessive action event representing a potential threat to the network. This column lists the event being tracked against the defined thresholds set for interpreting the event as excessive or permitted. |
| Enable | Displays whether tracking is enabled for each AP Anomaly event. Use the drop-down menu to enable/disable events as required. A green check mark defines the event as enabled for tracking against its threshold values. A red “X” defines the event as disabled and not tracked by the WIPS policy. Each event is disabled by default. |
Use the Enable All button to enable all AP Anomaly events. Use Disable All to disable all AP Anomaly events.
A WIPS signature is the set or parameters, or pattern, used by WIPS to identify and categorize particular sets of attack behaviors in order to classify them.
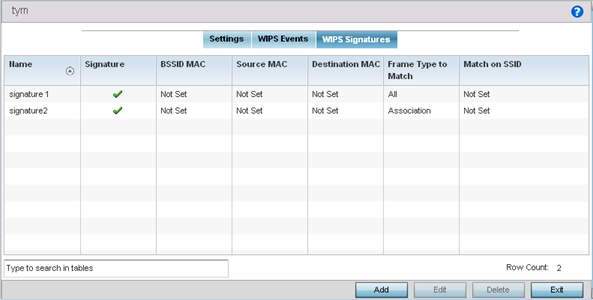
| Name | Lists the name assigned to each signature when it was created. A signature name cannot be modified as part of the edit process. |
| Signature | Displays whether the signature is enabled. A green checkmark defines the signature as enabled. A red “X” defines the signature as disabled. Each signature is disabled by default. |
| BSSID MAC | Displays each BSS ID MAC address used for matching purposes. |
| Source MAC | Displays each source packet MAC address for matching purposes. |
| Destination MAC | Displays each destination packet MAC address for matching purposes. |
| Frame Type to Match | Lists the frame types specified for matching with the WIPS signature. |
| Match on SSID | Lists each SSID used for matching purposes. |
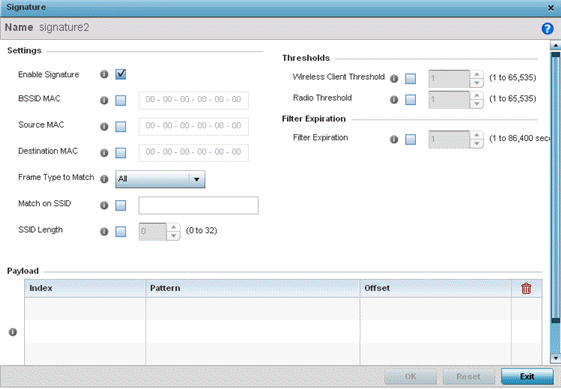
| Enable Signature | Select the radio button to enable the WIPS signature for use with the profile. The default signature is enabled. |
| BSSID MAC | Define a BSS ID MAC address used for matching and filtering with the signature. |
| Source MAC | Define a source MAC address for the packet examined for matching, filtering and potential device exclusion using the signature. |
| Destination MAC | Set a destination MAC address for a packet examined for matching, filtering and potential device exclusion using the signature. |
| Frame Type to Match | Use the drop-down menu to select a frame type for matching with the WIPS signature. |
| Match on SSID | Sets the SSID used for matching. Ensure it is specified properly or the SSID won‘t be properly filtered. |
| SSID Length | Set the character length of the SSID used for matching purposes. The maximum length is 32 characters. |
| Wireless Client Threshold | Specify the threshold limit per client that, when exceeded, signals the event. The configurable range is from 1 - 65,535. |
| Radio Threshold | Specify the threshold limit per radio that, when exceeded, signals the event. The configurable range is from 1 - 65,535. |
 Print
this page
Print
this page Email this topic
 Feedback
 View PDF
 Download EPUB