Configuring a Sensor Policy

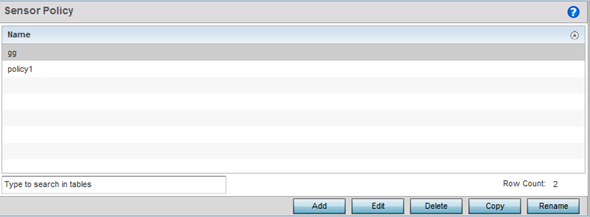
To define a sensor policy for use with an RF Domain:

  1. Select Configuration → Wireless → Sensor Policy to display existing sensor policies.
    Click to expand in new window
    Sensor Policy Screen
    GUID-BE3C0936-6DFA-4A98-A185-21205F32D7FB-low.png
  2. Click Add to define a new sensor policy, select an existing policy and click Edit to modify its configuration, or select an existing policy and click Delete to remove an obsolete policy.
    Optionally, Copy or Rename sensor policies as needed.

    When you are adding a new sensor policy, the Add New Sensor Policy screen displays:
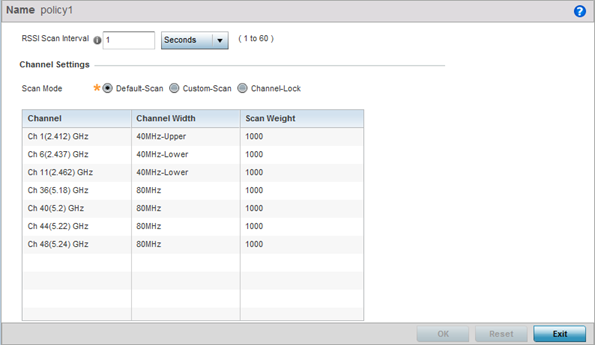
    Click to expand in new window
    Wireless - Sensor Policy - Add New Sensor Policy Screen
    GUID-1DBF79F0-7815-444B-8B6D-5E88039ADF5A-low.png
  3. Provide a name for this sensor policy in the Name field.
    Sensor policy name cannot exceed 32 characters and cannot contain spaces.
  4. Select Continue to create the sensor policy.
    The Sensor Policy Addition screen displays with the Scan Mode set to Default-Scan. The user configurable parameters on this screen differ, depending on which Scan Mode is selected.
  5. Use the RSSI Scan Interval drop-down menu to set a scan interval from 1 - 60 seconds.
    This is the scan period used by dedicated sensors (access point radios) for RSSI (signal strength) assessments. Once the sensor obtains the RSSI data, the sensor sends the data to a specified ExtremeLocation server resource (not an ADSP server) for calculating Wi-Fi device locations. The default is 1 second.
  6. Set the following Scan Mode values.
    The values you can select depend on whether you have selected Default-Scan, Custom-Scan, or Channel-Lock as the mode for scan operation.
    Channel

    With Default-Scan selected: The list of available scan channels is fixed and defaulted in a spread pattern of 1, 6, 11, 36, 40, 44 and 48. You cannot change this channel pattern.

    With Custom-Scan selected: A list of unique channels in the 2.4, 4.9, 5 and 6 GHz band can be collectively or individually enabled for customized channel scans and RSSI reporting.

    With Channel-Lock selected: The Channel, Channel Width, and Scan Weight fields are replaced by a Lock Frequency drop-down menu. Use this menu to lock the RSSI scan to one specific channel.

    Channel Width

    With Default-Scan selected: Each channel‘s width is fixed and defaulted to either 40MHz-Upper (Ch 1), 40MHz-Lower (Ch 6 and CH 11) or 80MHz (CH 36, CH 40, CH 44 and CH 48).

    With Custom-Scan selected: You can define the width for each selected channel. Note that many channels have their width fixed at 20MHz. 802.11a radios support 20 and 40 MHz channel widths.

    With Channel-Lock selected: You cannot adjust the width between adjacent channels, because only one channel is locked.

    Scan Weight

    With Default-Scan selected: Each default channel‘s scan is of equal duration (1000) within the defined RSSI scan interval. No one channel receives scan priority within the defined RSSI scan interval.

    With Custom-Scan selected: Each selected channel can have its weight prioritized in respect to the amount of time a scan is permitted within the defined RSSI scan interval.

    With Channel-Lock selected: With one channel locked for an RSSI scan, you cannot adjust scan weights for other, unlocked channels.

  7. Click OK to save the updates to the sensor policy configuration.
    Click Reset to revert to the last saved configuration.
  8. To create a copy of a sensor policy, select the policy and click Copy.
    Click to expand in new window
    Wireless - Sensor Policy - Copy Policy Screen
    GUID-4D96A406-AC65-45DB-AEB1-BACFBC5B408C-low.png

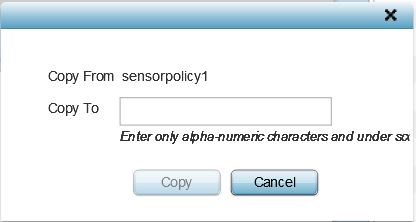
    Use the Copy To field to provide a name for the new sensor policy being created. The name of the new policy cannot be longer than 32 characters and cannot contain spaces.

  9. To rename an existing sensor policy, select the policy and click Rename.
    Click to expand in new window
    Wireless - Sensor Policy - Rename Policy Screen
    GUID-AD51F9F9-8DBE-4233-8136-5E711D7A1E0F-low.png

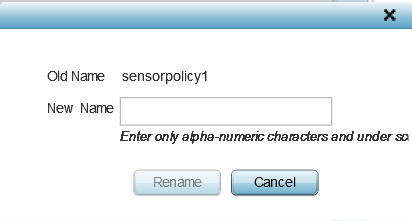
    Use the New Name field to provide a new name for the sensor policy. The new name cannot be longer than 32 characters and cannot contain spaces.

  10. To delete a sensor policy, select it and click Delete.
    This removes the policy from the list of sensor policies.