Before you can configure an alarm, you must drill down to it using the alarm tree. First, select an alarm type (such as Rogue Activity.) Click the + sign next to the alarm to display the alarm sub-type(s). Drill down until you reach the actual alarm. When you click on the alarm, the following screen is displayed.
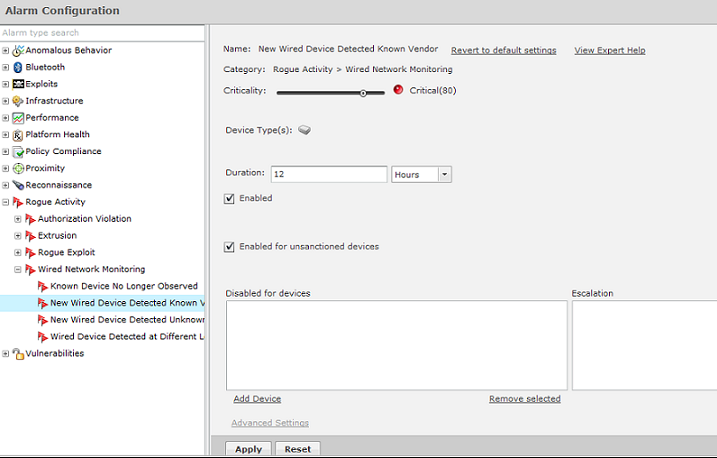
When an alarm is selected, the alarm configuration options are displayed on the right. You can view more information about an alarm by clicking the View Expert Help link. This will display another window where you can view the following alarm information by clicking the appropriate link:
You should change the options to fit your network environment. Available options are:
| Option | Description |
|---|---|
|
Name |
The name of the alarm. |
|
Criticality |
Use the sliding scale to set the alarm criticality to a value between 0 and 100. The designated color will automatically adjust as you move up or down the scale for Safe, Minor, Major, Critical, and Severe. The new numerical value will be used to calculate the Threat Score. |
|
Duration |
An active alarm means that at least one condition occurred that triggered the alarm, and the condition still holds true. When the condition of the alarm no longer holds, the alarm will remain visible for an amount of time called the Alarm Duration. Although you can customize the alarm duration, the default values are recommended. After the condition and the alarm duration have expired, the alarm becomes inactive, although it will remain visible in the historical logs. (You can view the historical logs using Forensic Analysis.) You can also clear an alarm before the duration expires. |
|
Enabled |
If checked, the alarm is enabled for all devices. |
|
Enabled for sanctioned |
If checked, the alarm is enabled for authorized devices. |
|
Enabled for unsanctioned devices |
If checked, the alarm is enabled for unauthorized devices. |
|
Enabled for neighboring devices |
If checked, the alarm is enabled for ignored devices. |
|
Disabled for devices |
The alarm is disabled for any device listed in the table. Click the Add Device button to add a device to the list. You are prompted to enter the devices MAC address. Typing a partial MAC address will list all the devices matching your typed string. You can then select the device or devices that you want to select. When you click on a device, it is automatically added to the list. Typing the entire MAC address will list only the device matching that address. Clicking the Advanced link will display a Device Search dialog window. You can then search for a device using any combination of the following criteria:
After selecting your search criteria, click the Search button to display a list of devices matching the search criteria. Click on the device or devices that you want to add to the device list. Click Close when you are done. You can return to the original window by clicking the Basic link where you can enter only the MAC address. Clicking the Remove selected link will remove the selected device from the list. |
|
Advanced Settings |
Depending on the alarm, this link may or may not be active. Its function varies according to the alarm. Normally, you will enter a value to place limits on an alarm. |
Click Apply to save your changes. You can revert back to the original settings by clicking the Reset link.
The Check Synchronization button is used to check all appliances in the network to ensure they are using the same alarm configuration. (The synchronization features works basically the same way wherever the feature is implemented. Synchronizing Accounts has a good example of how the synchronization feature works.)

Note
You must have a Central Management license in order to use the Check Synchronization feature.