Automatic Synchronization

As with manual synchronization, use the Redundant Appliance Synchronization screen to synchronize the configurations from your primary server to the secondary server.

Click to expand in new window
Redundant Appliance Synchronization Screen

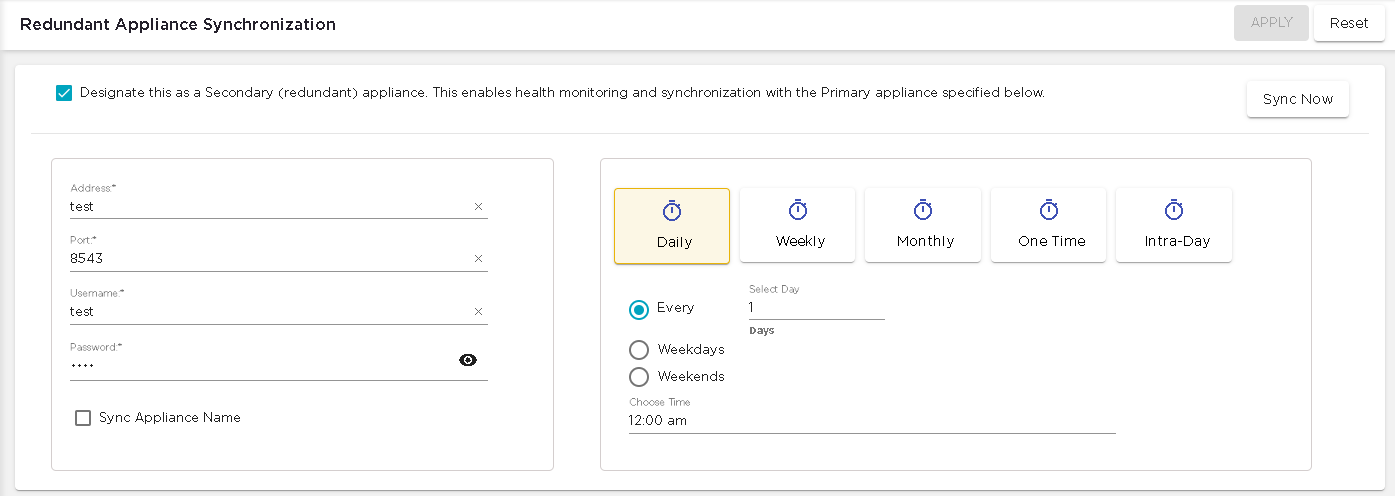
Use the left pane of this screen to provide the details for the primary Extreme AirDefense appliance.

The right pane of this screen enables you to automatically synchronize configurations from the primary server on a pre defined schedule.

Before you can synchronize between two devices, you must designate the current device as a redundant device. Select the Designate this as a Secondary (redundant) device... option to indicate that this device is a redundant server. When this option is not selected, this device becomes the primary server and all the fields in this screen are disabled.

To automatically synchronize this Extreme AirDefense appliance with a primary server, provide the following information:

Field Description
Address The IP address or host name of the primary Extreme AirDefense appliance.
Port The port number on which the Extreme AirDefense primary server is running. 8543 is the default port.
Username The username for an account that has login permissions on the primary Extreme AirDefense server.
Password Password for the above username.
Sync Appliance Name Select this option if you want to synchronize the appliance names between the primary and secondary servers.
Sync Mail Relay Select this option if you want to synchronize the mail relay server information between the two servers.

The right pane of this screen enables you to configure the schedule for automatic synchronization. Set the following parameters:

Field Description
Daily

The following configurations are available for the Daily schedule.

  • Every - Use this field to synchronize the servers every set number of days. Use the spinner control to set the number of days between two consecutive backups. The value can be set between 1-31 days.
  • Weekdays - Use this field to enable synchronization to take place only on week days. Synchronization does not happen on weekends, i.e., Saturdays and Sundays.
  • Weekdays - Use this field to enable synchronization to take place only on weekends. Synchronization is only performed on Saturdays and Sundays.
  • Choose Time - Use this field to set the time when the synchronization happens every day.
Weekly

The following configurations are available for the Weekly schedule.

  • Select Weekday - Use this drop-down list to select the specific weekday or weekdays on which this schedule will run. Use the check-box before each day to select it. You can select multiple weekdays.
  • Choose Time - Use this field to set the time when the synchronization happens every day.
Monthly

The following configurations are available for the Monthly schedule.

  • Select Month - Use this drop-down list to select the specific month or months during which this schedule will run. Use the check-box before each month to select it. You can select multiple months.
  • Day - Use the Day control to indicate the numerical date on which this schedule will run. For example, if this value is fifteen (15), then this schedule is run on the 15th of the selected month or months.
  • Last day of the month - Use this control to indicate the schedule is to be run on the last day of the month of the selected month or months.
  • Use the last option to indicate a specific schedule that is repeated at a particular combination. For example, if the values are Second and Saturday, then this schedule will run only on the second Saturday of the selected month or months.
  • Choose Time - Use this field to set the time when the synchronization happens every day.
One Time

The following configurations are available for the One Time schedule.

  • Choose a date - Use this field to select the particular date on which you want to run this schedule. Use the calendar icon next to this field to select the date.
  • Choose Time - Use this field to set the time when the synchronization happens every day.
Intra-Day

The following configurations are available for the Intra-Day schedule. This schedule is used to take multiple backups on the same day.

  • Set Frequency - Use this field to define the frequency of this intra-day backup schedule. When this value is specified, a backup is taken with this frequency. For example, when this value is set to three (3), a configuration backup is taken every three hours.
  • Choose Time - Use this field to set the time when the intra-day synchronization is started. For example, if the value is set at 10: 30 am, then the first synchronization of the day will be done at the above time. Subsequent synchronizations will be taken after ever Set Frequency interval.

Once you have configured your synchronization schedule, use the APPLY button to save the schedule. To exit without saving your changes, use the RESET.