Remote Authentication is used authenticate users by using the password stored on a RADIUS or LDAP server. This reduces the cost of managing different passwords across different systems and avoids replication of password data throughout multiple databases. To access this feature, go to .
Remote authentication lets your organization consolidate authentication databases for easier administration. A potential problem with remote authentication may arise if the authentication server is not available because of network problems or problems on the appliance hosting the authentication service. For this reason, you should maintain one or more Admin user accounts with local authentication.
Setting users up for remote authentication is a three-step process:
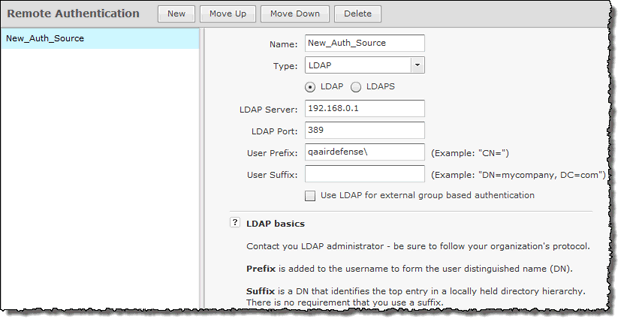
To get started, click the New button. Remote Authentication fields are displayed so that you can set up Remote Authentication.

Note
If you encounter problems, contact your LDAP administrator. He/she can advise you on how to fill in the fields. If you can, use an LDAP browser ( https://www.ldapadministrator.com/download.htm) to login and browse. This will allow you to test your settings to see if they are right. There should also be errors in the LDAP server log that give more details on the problem.Use the following table to enter data into the fields:
| Field | Description |
|---|---|
|
Name |
Enter a configuration name. |
|
Type |
Select a server type from the drop-down menu: LDAP or RADIUS. |
|
Protocol |
Select a protocol type by clicking the appropriate radio button: LDAP or LDAPS. If the using a RADIUS server, the protocol type is selected from a drop-down menu. The options are PAP, CHAP, MSCHAP, or MSCHAPv2. |
|
LDAP Server |
Enter the IP Address of the LDAP server. This option only displays for LDAP servers. |
|
RADIUS Server |
Enter the IP Address of the RADIUS server. This option only displays for RADIUS servers. |
|
LDAP Port |
Enter the authorization server port number. This option only displays for LDAP servers. |
|
RADIUS Port |
Enter the authorization server port number. This option only displays for RADIUS servers. |
|
Shared Secret |
Enter the shared secret password for the RADIUS server. You can make passwords viewable by selecting the Display Passwords checkbox. This option only displays for RADIUS servers. |
|
Timeout |
Enter a timeout value for authentication. This option only displays for RADIUS servers. |
|
Retries |
Enter the number of times to retry authentication. This option only displays for RADIUS servers. |
|
User Prefix |
Enter the name of the windows domain for the server (e.g., qaairdefense\). User Prefix is optional. You can leave this field blank or you can supply a prefix ending in a backslash (\) or a double backslash (\\). You may have to experiment to see which option is valid for you. |
|
User Suffix |
Enter the Internet domain name for the server (User Suffix is optional.) You can leave this field blank or you can supply a suffix. |
|
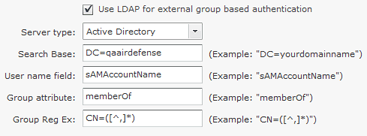
Use LDAP for ... |
This field is displayed if LDAP is chosen for the Type field. Select this checkbox if you are using external group based authentication. If checked, more fields are displayed.
If the LDAP administrator changes any of the strings from what is normally used, he/she must inform you of the string to use. Example:
 |
|
Use RADIUS for ... |
This field is displayed if RADIUS is chosen for the Type field. Select this checkbox if you are using external group based authentication. If checked, more options are displayed.
Example: 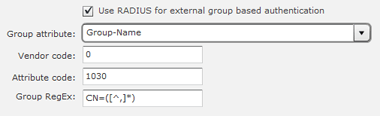 |
After the entering the Remote Authentication data, click the Apply button to save the configuration. The configuration name is now displayed in the list on your left. If you highlight (click) a name in the list you can edit the fields for that configuration. You may also delete any highlighted configuration by clicking the Delete button. You can change the order of configuration preference using the Move Up or Move Down button.
You can test your Remote Authentication configuration using the Test Authentication button for user accounts or group accounts. For help using this button, see Authentication or User Roles.
The Check Synchronization button is used to check all appliances in the network to ensure they are using the same Remote Authentication. (The synchronization features works basically the same way wherever the feature is implemented. Synchronize Accounts has a good example of how the synchronization feature works.)
Note
You must have a Central Management license in order to use the Check Synchronization feature.Click the X in the top, right corner to exit the Remote Authentication Synchronization overlay.