Sharing certificates not in the default state involves some extra steps. The
following conditions must be met:
The slave appliance must first be
added using Add Devices under the Menu
Both servers must be able to
successfully ping each other
Both master and slave must be
running the same build
The user name and passwords are
entered correctly in Share certificate window, and the Alias field has the slave
appliance IP address.
The procedure to sharing certificates in the default state is:
Note
This procedure assumes that you
have added a certificate using the procedures under Add
Certificates.
Access the Certificate
Manager.
In the Appliance field,
select the slave appliance.
Type in the certificate
password and then click View
Certificates.
Click the Share Appliance
Certificate button.
Note
The Share Appliance
Certificate button is only visible after adding the slave
appliance with Add
Devices.
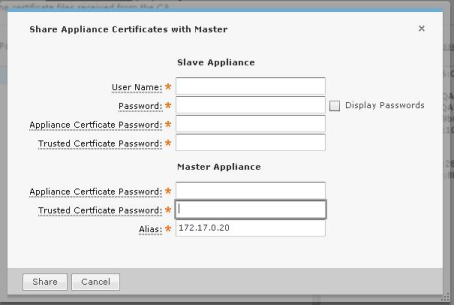
Fill in the above dialog window
with the following information:
For the slave appliance:
The user name and
password used to access the GUI
The appliance certificate
password
The trusted certificate
password.
For the master appliance:
The appliance certificate
password
The trusted certificate
password.
An alias that will show
up in the trusted certificates on the slave. The default is the slave
appliance IP address. This field is for identification purposes. You can
change it to whatever you want it to be.
Click the Share button.
Click OK.
On the master appliance, access
the Trusted
Certificate tab.
In the Appliance field,
select the master appliance.
Type in the certificate
password and then click View
Certificates.
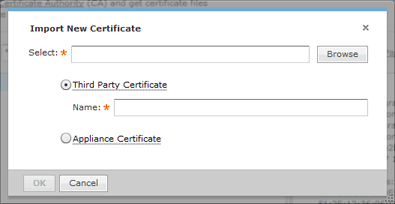
Click the Import New
button.
Browse to CA certificate and
select it.
Click OK.
Restart the master appliance.
On the slave appliance, access
the Trusted
Certificate tab and then repeat steps 9 through 13.
Restart the slave appliance.
Check the master appliance to
see that the slave appliance is now online.